
Have you ever faced the frustration of your gas water heater suddenly stopping and showing an error code? Those mysterious numbers and letters on your heater’s display can feel confusing and worrying.
But what if you could quickly understand what those error codes mean and fix the problem yourself? Knowing these codes can save you time, money, and stress. You’ll discover the most common gas water heater error codes, what causes them, and simple steps you can take to get your hot water flowing again fast.
Keep reading—you’re about to become your own water heater expert.
Credit: www.yumpu.com
Page Contents
- 1 Common Gas Water Heater Errors
- 2 Reading Error Codes
- 3 Quick Fixes For Ignition Errors
- 4 Resolving Flame Sensor Issues
- 5 Thermocouple Troubleshooting
- 6 Handling Overheating Alerts
- 7 Fixing Pilot Light Problems
- 8 Preventative Maintenance Tips
- 9 When To Call A Professional
- 10 Frequently Asked Questions
- 11 Conclusion
Common Gas Water Heater Errors
Gas water heaters are common in many homes. They provide hot water quickly and efficiently. Still, they can show error codes that signal problems. Knowing these common errors helps you act fast and avoid bigger issues.
Many errors come from simple parts that fail or get dirty. Some errors cause the heater to stop working. Others make it unsafe to use. Understanding these errors can save time and money on repairs.
Ignition Failure
Ignition failure means the heater cannot light the gas. This stops the water from heating. Causes include dirty burners or faulty ignition components. Checking the ignition system regularly prevents this error.
Flame Sensor Issues
The flame sensor detects the burner flame. If it is dirty or broken, the heater shuts off. This stops gas leaks and unsafe conditions. Cleaning or replacing the sensor fixes the problem quickly.
Thermocouple Problems
The thermocouple senses if the pilot light is on. A bad thermocouple shuts the gas valve to prevent leaks. It can fail due to age or damage. Testing and replacing it ensures safe operation.
Overheating Alerts
Overheating alerts warn that the water heater is too hot. This can damage the unit or cause burns. The cause might be a faulty thermostat or blocked vents. Addressing these issues keeps the heater safe.
Pilot Light Malfunctions
Pilot light malfunctions stop the heater from lighting the burner. Causes include draft, dirt, or gas supply issues. Relighting the pilot or cleaning the area often solves the problem. A steady pilot light keeps water hot.
Reading Error Codes
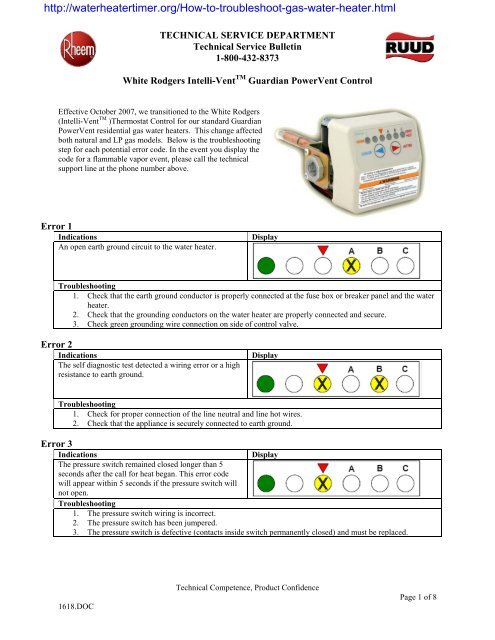
Reading error codes on a gas water heater helps you understand the problem quickly. These codes are like messages from the heater. They tell you what needs fixing. Knowing how to read them saves time and money.
Locating The Code Display
Most gas water heaters have a small screen or light panel. This is where error codes show up. It might be near the control panel or on the front of the unit. Some models use blinking lights instead of a screen. Check your heater’s front or side for these displays.
Interpreting Blinking Patterns
Blinking lights often mean an error code. The number of blinks and pauses tell the exact issue. For example, three blinks followed by a pause might point to a gas supply problem. Counting blinks carefully is important. This helps you identify the right error code fast.
Consulting Manufacturer Guides
Each brand has its own error code list. The user manual or manufacturer website usually has this information. Match the code or blink pattern to the guide. This explains what the problem is and how to fix it. Always keep your manual handy for quick reference.
Quick Fixes For Ignition Errors
Ignition errors in gas water heaters can be frustrating. These errors stop the heater from working and leave you without hot water. Many ignition problems have simple fixes you can try yourself. Quick checks can save time and avoid costly repairs. Follow these easy steps to get your heater running again fast.
Checking Gas Supply
Start by making sure the gas supply is on. A closed valve stops gas from reaching the heater. Check the main gas valve and the valve near the heater. Turn them on if they are off. Also, check for any gas leaks or smells. Never ignore the smell of gas. If you detect gas, call a professional immediately.
Cleaning The Burner
Dirt and dust can block the burner, causing ignition errors. Turn off the heater and gas before cleaning. Remove the burner cover carefully. Use a soft brush or cloth to clean the burner area. Clear away any debris or spider webs. A clean burner helps the flame start quickly and stay steady.
Resetting The System
Resetting the water heater can clear error codes and restart the ignition process. Find the reset button on the heater panel. Press and hold it for a few seconds. Release the button and wait for the system to reboot. This often fixes minor glitches and restores normal function.
Resolving Flame Sensor Issues
Flame sensor issues often cause gas water heater error codes. The sensor detects the flame to keep the heater running safely. A dirty or faulty sensor stops the heater from working. Fixing this problem restores your water heater’s performance. Simple steps can clean or replace the sensor. This guide helps you resolve flame sensor issues quickly.
Cleaning The Sensor
Turn off the power and gas supply to the heater first. Locate the flame sensor near the burner. Remove it carefully using a screwdriver. Wipe the sensor with fine sandpaper or steel wool. Clean off all dirt and corrosion gently. Avoid using water or harsh chemicals. Reinstall the sensor and turn the power back on. This often fixes flame detection problems.
Replacing Faulty Components
Sometimes cleaning is not enough to fix the sensor. A damaged or worn sensor needs replacement. Buy a sensor that matches your heater model. Turn off power and gas before starting work. Remove the old sensor carefully from the burner assembly. Install the new sensor and secure it tightly. Restore power and gas, then test the heater. Replacing faulty parts keeps your heater safe and efficient.
Thermocouple Troubleshooting
The thermocouple is a small but vital part of a gas water heater. It senses the pilot light’s heat and allows gas to flow safely. Problems with the thermocouple often cause error codes and heating issues. Troubleshooting the thermocouple helps find and fix these problems quickly. This guide shows how to test, adjust, or replace the thermocouple. Follow these steps to keep your water heater working well and safely.
Testing Thermocouple Function
Turn off the gas supply before testing the thermocouple. Use a multimeter to check its voltage output. A healthy thermocouple produces about 25-30 millivolts when heated. Light the pilot light and hold the sensor in the flame. Watch the multimeter reading carefully. A low or zero reading means the thermocouple may be faulty. Check the wire connections for dirt or corrosion. Clean the connections if needed and test again. Repeat the test to confirm the results.
Adjusting Or Replacing The Thermocouple
Sometimes, the thermocouple just needs adjustment. Make sure the tip sits fully in the pilot flame. Tighten any loose screws holding the thermocouple. If adjustment does not fix the problem, replacement is next. Turn off the gas and let the heater cool down. Unscrew the old thermocouple from the gas valve and pilot assembly. Match the new thermocouple size and type to the old one. Install the new thermocouple securely in place. Turn on the gas and light the pilot light again. Test the water heater to ensure proper function.

Credit: www.etrailer.com
Handling Overheating Alerts
Overheating alerts on a gas water heater signal a serious problem. These alerts prevent damage and keep your home safe. Understanding how to handle them can save you time and money. Start with some simple checks before calling a professional.
Inspecting The Temperature Sensor
The temperature sensor tells the heater how hot the water is. Dirt or damage can cause false overheating alerts. Turn off the heater and locate the sensor. Clean it gently with a soft cloth. Check for any cracks or loose wires. Replace the sensor if it looks damaged.
Checking Water Pressure
Water pressure affects the heater’s performance. High pressure can cause the water to overheat. Use a pressure gauge to check the water pressure. The ideal range is between 40 and 60 psi. Adjust the pressure regulator if the reading is too high. Low pressure can also cause problems, so keep it balanced.
Flushing The Tank
Mineral build-up inside the tank can cause overheating. Flushing removes these deposits and improves heater efficiency. Turn off the gas and water supply. Attach a hose to the drain valve and empty the tank. Run clean water through to flush out sediments. Repeat this process yearly to prevent future alerts.
Fixing Pilot Light Problems
Pilot light problems are a common cause of gas water heater errors. The pilot light helps ignite the burner to heat the water. Fixing issues with the pilot light can restore your heater’s function quickly and safely.
Simple steps like relighting, cleaning, or replacing the pilot light often solve the problem. Each step ensures the pilot light works reliably. Careful attention is important to avoid gas leaks or other hazards.
Relighting The Pilot
Turn off the gas supply first. Wait five minutes to clear any gas. Find the pilot light knob and press it down. While holding the knob, use a long lighter to ignite the pilot. Keep holding the knob for about 30 seconds after ignition. Release the knob slowly. The pilot light should stay lit. If it goes out, repeat the process carefully.
Cleaning The Pilot Assembly
Turn off the gas and power supply to the heater. Remove the cover panel to access the pilot assembly. Use a soft brush or compressed air to clean dirt and dust. Clear any blockages around the pilot opening. Check the thermocouple for dirt and clean gently. Cleaning improves gas flow and ignition. Put the cover back on and test the pilot light again.
Replacing The Pilot Light
Turn off the gas and power supply. Locate the pilot light assembly and disconnect it carefully. Remove the old pilot light and thermocouple. Install the new pilot light in the same position. Reconnect the thermocouple and gas line. Turn on the gas supply and power. Light the pilot using the relighting steps. Test the water heater to ensure proper function.
Preventative Maintenance Tips
Keeping your gas water heater in good shape prevents many common error codes. Regular care helps the heater work safely and last longer. Small steps can save big repair costs and stress.
Regular Cleaning Schedule
Clean your water heater every few months. Remove dust and dirt from vents and burners. This keeps air flowing and stops blockages. Check for rust or leaks around pipes. Wipe the exterior with a damp cloth to prevent grime build-up.
Annual Professional Inspections
Hire a certified technician once a year. They check parts that you cannot see. The professional tests gas connections and safety valves. They find small problems before they become big ones. This inspection keeps your heater running safely and efficiently.
Safe Operation Practices
Always follow the manufacturer’s instructions for use. Do not block air vents or flues. Keep flammable items away from the heater. Turn off the gas supply if you smell gas. Regularly check the pilot light to ensure it stays lit. Safe use reduces errors and hazards.
When To Call A Professional
Gas water heater error codes can be confusing and worrying. Some problems are simple to fix. Others need a trained technician. Knowing when to call a professional saves time and keeps you safe.
Minor issues might be solved by a quick reset. But some errors show deeper problems. Gas appliances can be dangerous without proper care. Do not take risks with gas leaks or complex faults.
Persistent Error Codes
Some error codes keep appearing even after resets. These persistent codes mean the problem is not fixed. A professional can find the root cause. They have tools to diagnose and repair safely.
Gas Leak Concerns
Smell gas or suspect a leak? Call a professional immediately. Gas leaks are very dangerous. Experts know how to detect and stop leaks safely. Do not try to fix leaks yourself.
Complex Repairs
Errors involving internal parts need expert help. Repairs inside the heater can be tricky. Professionals have experience and the right tools. They ensure the heater works properly and safely after repair.
Credit: go-assist.co.uk
Frequently Asked Questions
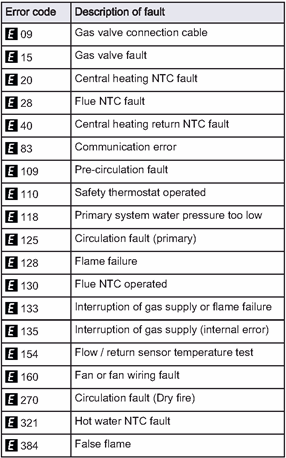
What Do Common Gas Water Heater Error Codes Mean?
Gas water heater error codes indicate specific issues like ignition failure, sensor problems, or overheating. Each code helps diagnose and fix the problem quickly, ensuring safe and efficient operation.
How Can I Reset Gas Water Heater Error Codes?
To reset error codes, turn off the heater, wait a few minutes, then turn it back on. Consult your manual for model-specific reset steps to avoid damage or recurring errors.
Why Is My Gas Water Heater Showing An Error Code?
Error codes appear due to faults like gas supply issues, faulty sensors, or overheating. They alert you to problems needing immediate attention or professional repair to prevent damage.
Can I Fix Gas Water Heater Error Codes Myself?
Some errors, like resetting or cleaning sensors, can be fixed by homeowners. However, complex issues require professional service to ensure safety and proper repair.
Conclusion
Gas water heater error codes help you find problems fast. Knowing these codes saves time and money. You can fix small issues yourself or call a professional when needed. Always check the code before ignoring any problem. Staying informed keeps your heater safe and working well.
Remember, quick action stops bigger troubles later. Keep this guide handy for easy reference. Your heater will run smoothly with simple care and attention.