
To replace a thermocouple on a water heater, first turn off the gas supply. Then, disconnect the old thermocouple and install the new one.
A thermocouple is a crucial component of a water heater, ensuring safe operation by detecting the pilot light. Regular maintenance and timely replacement can prevent malfunctions. Replacing a thermocouple is a straightforward task requiring basic tools and minimal time. This guide will help you understand the steps involved, ensuring a hassle-free process.
By following these steps, you can maintain your water heater’s efficiency and safety. Proper maintenance prolongs the lifespan of your appliance, saving you money in the long run. Ensure you have the right tools and a replacement thermocouple before starting the process.
:max_bytes(150000):strip_icc()/replacing-water-heater-thermocouple-flame-sensor-1824918-02-c867831fe43644f0ae9b04344e18f64f.jpg)
Credit: www.thespruce.com
Page Contents
Tools And Materials Needed
You need a few important tools for this job. A wrench will help you loosen and tighten parts. A screwdriver is useful for removing screws. Pliers are needed to handle small parts. A multimeter helps to check if the thermocouple is working. Safety gloves will protect your hands.
Make sure to have all the required materials. A new thermocouple is the most important. You might also need some tape to secure parts. Sandpaper can help clean the area. A clean cloth is useful for wiping down surfaces.
Credit: www.homedepot.com
Safety Precautions
Ensure the gas supply is turned off before starting. Use proper tools and wear safety gloves to avoid injuries. Always follow the manufacturer’s instructions for a safe replacement.
Turning Off The Gas
Always turn off the gas before starting. Locate the gas valve. Turn the valve to the “off” position. This stops the gas flow. Check if the gas is off by trying to light the heater. If it doesn’t light, the gas is off. This step ensures there is no gas leak. Gas leaks can be dangerous.
Ensuring Proper Ventilation
Proper ventilation is very important. Open windows and doors. This allows fresh air to come in. Fresh air prevents gas build-up. Gas build-up can cause explosions. Never work in a closed space with gas. Always keep the area well-ventilated.
Accessing The Thermocouple
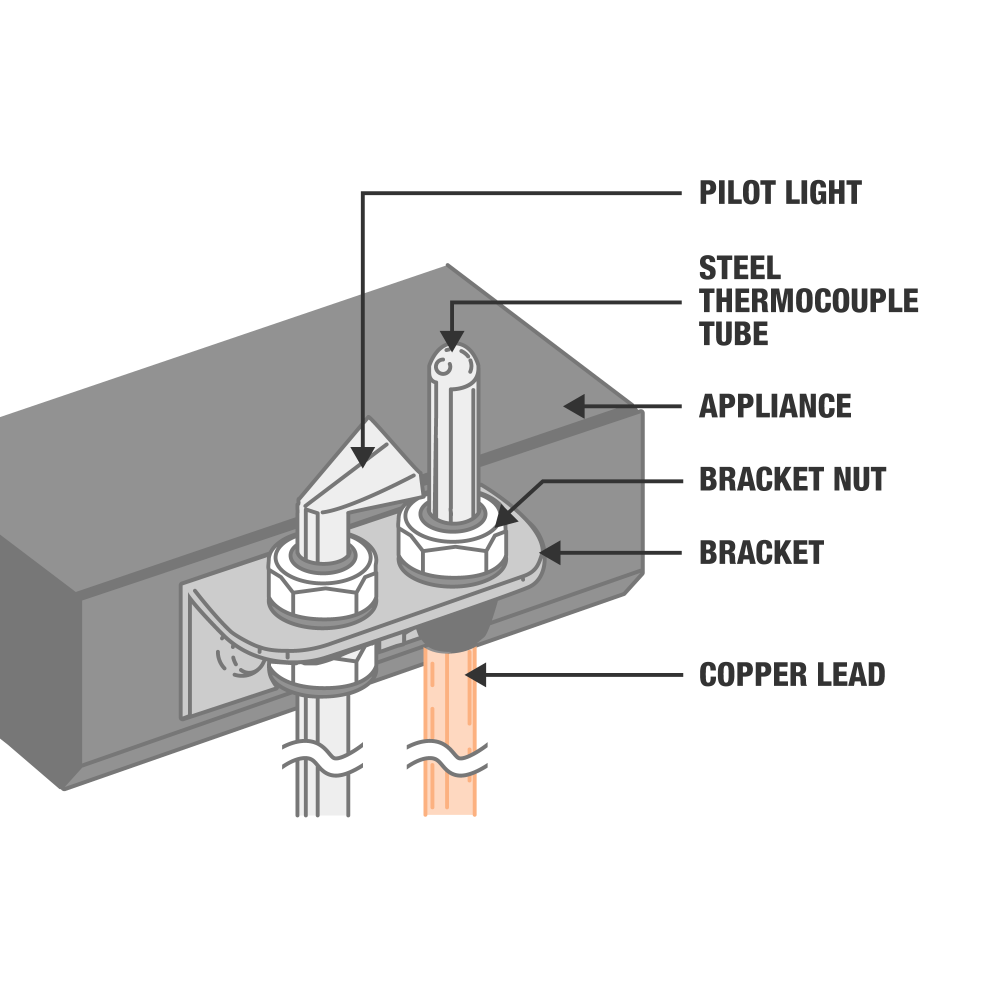
First, find the water heater’s control knob. Turn it to the “Off” position. Look for the burner access panel at the bottom. The thermocouple is near the pilot light assembly.
Use a screwdriver to remove screws from the access panel. Carefully lift off the panel. Set it aside. You will see the burner and pilot assembly inside.
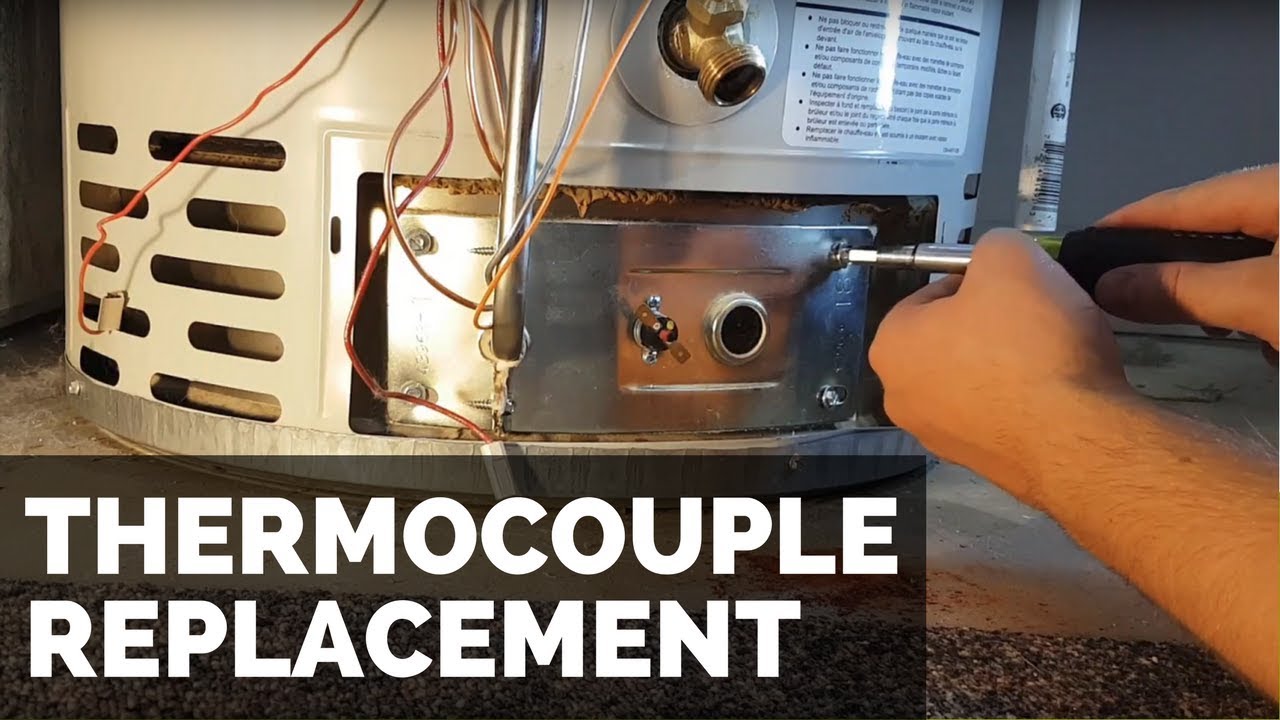
Removing The Old Thermocouple
Turn off the gas supply to the water heater. Use a wrench to loosen the nuts. Disconnect the thermocouple from the gas valve. Be careful not to damage nearby parts. Check for any debris around the connections. Clean if necessary before proceeding.
Locate the thermocouple near the burner assembly. Gently pull the thermocouple out of its holder. Avoid bending or breaking it during removal. Inspect the thermocouple for signs of wear. Dispose of the old thermocouple properly.
Installing The New Thermocouple
The new thermocouple must be placed near the pilot light. Ensure the tip is directly in the flame. This allows it to detect the heat properly. Align the other end with the gas valve. This helps in connecting it securely. Avoid bending the thermocouple too much. This can cause damage.
Use a wrench to tighten the thermocouple to the gas valve. Make sure it is snug but not over-tightened. This helps in preventing gas leaks. Reattach any screws or clips that were removed earlier. This secures the thermocouple in place. Double-check the connections to ensure they are firm. This ensures the thermocouple works correctly.
Reassembling And Testing
First, make sure the thermocouple is in place. Use a screwdriver to reattach the screws. Tighten them securely but do not over-tighten. Next, place the access panel back on the water heater. Align it properly with the holes. Fasten the panel with screws. Ensure all parts are tight and secure.
Turn on the gas supply to the water heater. Relight the pilot light according to the manufacturer’s instructions. Set the temperature to the desired level. Wait for the water to heat up. Check for hot water from the tap. Ensure the heater is functioning correctly. Check for any leaks around the access panel. If everything is fine, the job is done.
Troubleshooting
Water heater not heating water can be a common issue. The thermocouple might be broken. Look for pilot light problems. Ensure the gas valve is on. Check for any loose connections. Dirt or debris can block the thermocouple. Clean it properly to avoid issues. Always check for gas leaks. Safety is important.
Call a professional if you smell gas. Gas leaks are dangerous. No hot water after troubleshooting? Call for help. Pilot light won’t stay lit? Seek professional help. Thermocouple replacement seems hard? Better to call an expert. If unsure about any step, don’t risk it. Professionals have the right tools and knowledge. Safety should be your priority.
Credit: www.youtube.com
Maintenance Tips
Check the thermocouple every few months. Look for signs of wear and tear. Make sure the thermocouple is clean. Dirt can cause problems. Inspect the connections for any loose wires. Tighten them if needed. Ensure the pilot light is strong. A weak flame may indicate issues.
Keep the area around the water heater clean. Dust and debris can damage the thermocouple. Avoid using harsh chemicals near the heater. Chemicals can corrode the thermocouple. Check the burner regularly. A clean burner helps the thermocouple work better.
Replace the thermocouple every few years. Old thermocouples can fail suddenly. Always use high-quality parts. They last longer and work better. Following these tips will help you extend the life of your thermocouple.
Frequently Asked Questions
What Is A Thermocouple In A Water Heater?
A thermocouple is a safety device in gas water heaters. It detects the pilot light and shuts off gas if the flame goes out.
How Do I Know If My Thermocouple Is Bad?
If your water heater pilot light won’t stay lit, the thermocouple may be faulty. It’s a common issue.
Can I Replace A Thermocouple Myself?
Yes, replacing a thermocouple is a simple DIY task. Ensure the water heater is off and follow safety guidelines.
What Tools Are Needed To Replace A Thermocouple?
You’ll need a wrench, screwdriver, and a new thermocouple. These are common tools found in most households.
Conclusion
Replacing a thermocouple on your water heater can save money and extend its life. Follow the steps carefully and safely. A well-maintained water heater ensures efficient performance. Regular checks and timely replacements are key. Keep your water heater running smoothly for years to come.