
Are you tired of your Rheem water heater acting up just when you need a hot shower the most? You’re not alone.
Many homeowners face the hassle of inconsistent water temperatures, strange noises, or even complete shutdowns. But before you reach for your phone to call in a costly repair service, take a moment to explore some easy troubleshooting steps you can try at home.
In this guide, we’ll walk you through straightforward solutions that could save you time, money, and frustration. Imagine the relief of solving the problem yourself and enjoying a reliable hot water supply once again. Ready to dive in? Let’s get started and restore that comforting warmth to your home.
Page Contents
Common Issues
Rheem water heaters are known for their reliability, but like any appliance, they can sometimes run into issues. Understanding these common problems is the first step toward resolving them. Whether you’re dealing with fluctuating water temperatures or strange noises, knowing what to look for can make troubleshooting much easier. Let’s dive into the common issues you might face with your Rheem water heater.
Temperature Fluctuations
Have you ever set your water heater to a comfortable temperature, only to find it running too hot or too cold? This can be frustrating. Often, temperature issues arise from a faulty thermostat or sediment build-up. Checking the thermostat settings and flushing the tank can help restore balance.
No Hot Water
Few things are as annoying as expecting a hot shower and getting cold water instead. If your Rheem water heater isn’t producing hot water, it might be due to a tripped circuit breaker or a broken heating element. Resetting the breaker or replacing the element might solve the problem.
Strange Noises
Does your water heater sound like it’s auditioning for a horror movie? Those strange noises often come from sediment build-up in the tank. As the heater works, the sediment can harden and create popping or rumbling sounds. Regularly flushing the tank can prevent these unsettling noises.
Spotting a puddle under your water heater isn’t just a nuisance; it can lead to bigger problems. Leaks often result from a faulty valve or loose connections. Inspect the pressure relief valve and tighten any loose fittings to tackle this issue head-on.
Discolored Water
If your hot water looks rusty or has an odd color, it might be time to check the anode rod. This component protects the tank from corrosion. A worn-out anode rod can lead to discolored water, so replacing it might be necessary.
Have you faced any of these issues with your Rheem water heater? How did you tackle them? Addressing these problems early can prolong the life of your appliance. Remember, regular maintenance is your best ally in preventing future headaches.
Temperature Problems
Experiencing temperature issues with a Rheem water heater can be frustrating. Often, troubleshooting involves checking the thermostat settings or inspecting the heating elements for faults. Simple adjustments or replacements may resolve these common problems, ensuring consistent hot water supply.
Temperature problems with your Rheem water heater can be frustrating. They often disrupt daily routines. Understanding these issues is key to fixing them. This guide will help you troubleshoot temperature-related concerns. From no hot water to fluctuating temperatures, solutions are within reach. Keep reading for clear and practical advice.No Hot Water
Experiencing no hot water? Check the power supply first. Ensure the heater is plugged in. Examine the circuit breaker for tripped switches. Inspect the thermostat settings. They might be set too low. Adjust to a higher temperature. If problems persist, the heating element may be faulty. Consider professional assistance for element replacement.Water Too Hot
Water too hot can scald. Verify the thermostat setting. It might be set too high. Lower the temperature setting. Check the pressure relief valve. It may be blocked. Clean or replace if necessary. Regular maintenance prevents overheating issues. Ensure the heater is not near heat sources. They can affect temperature control.Fluctuating Temperature
Fluctuating water temperature can be annoying. Inspect the thermostat for accuracy. It might need recalibration. Check for sediment build-up in the tank. Sediment impacts temperature regulation. Flushing the tank can help. Assess the dip tube condition. A damaged dip tube disrupts water flow. Replace if necessary to stabilize temperature. These tips can resolve common temperature issues. Don’t hesitate to seek professional help for complex problems.Pilot Light Challenges
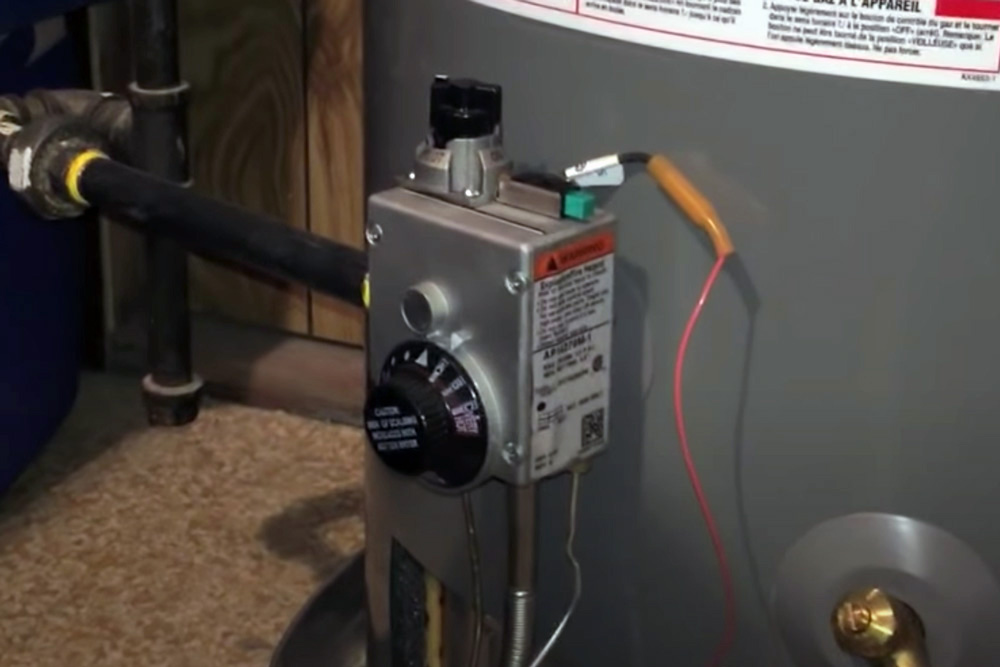
Have you ever found yourself shivering under a cold shower because your Rheem water heater’s pilot light refuses to cooperate? You’re not alone. Many homeowners face pilot light challenges, which can be frustrating yet easily solvable with a bit of troubleshooting know-how.
Pilot Won’t Light
If your pilot won’t light, it might be time to check a few common culprits. First, ensure there is gas supply to the heater. A simple way to test this is by checking other gas appliances in your home. If they work, your gas supply is likely fine.
Next, inspect the thermocouple. This small component plays a big role—it signals the gas valve to open when the pilot light is lit. If it’s dirty or misaligned, it may prevent the pilot from lighting. Cleaning or adjusting it might just solve your problem.
Ever had a friend tell you about a time they struggled with this and finally discovered a blockage in the pilot tube? It happens! Cleaning the tube can often clear the obstruction and allow the pilot to light. Could this be your issue?
Pilot Light Goes Out
If your pilot light goes out frequently, you might start questioning its reliability. Let’s tackle this. The thermocouple could again be the culprit here. If it’s not staying heated, it signals the gas valve to shut off, causing the light to go out.
Consider drafts. Is there a breeze blowing through the area where your water heater is installed? A simple fix might be to adjust the room’s ventilation or install a draft shield. You’d be surprised how often this simple adjustment can stabilize the pilot light.
Also, think about the pilot flame itself. A weak flame might mean it’s not strong enough to maintain the thermocouple’s heat. Adjusting the flame size or cleaning the pilot assembly can often make a significant difference.
When troubleshooting these issues, always prioritize safety. Are there any other unexpected insights or experiences that have solved your pilot light challenges? Share them—your tips might just help someone else stay warm and worry-free.
Credit: www.greensafaris.com
Water Leaks
Experiencing water leaks with a Rheem water heater can be frustrating. Quick troubleshooting steps help identify issues like faulty valves or loose connections. Regular maintenance and inspection prevent further damage, ensuring efficient operation.
When dealing with Rheem water heaters, one common issue many homeowners face is water leaks. Leaks can vary from minor drips to major spills, potentially leading to water damage or increased utility bills. Understanding how to identify and fix these leaks can save you time, money, and headaches. But how do you even start tackling this problem? Let’s dive into the essentials of detecting and repairing leaks in your Rheem water heater.Leak Detection
Detecting leaks early can prevent more severe problems. Start by checking the area around your water heater for any signs of moisture or puddles. Is there a consistent wet spot on the floor? Is the wall nearby damp? If you notice any of these signs, it’s time to investigate further. Inspect the water heater itself. Look closely at the connections, pipes, and the tank’s exterior. Sometimes, a leak might be as simple as a loose fitting or a faulty valve. Use a dry cloth to wipe around these areas, checking for moisture. If the cloth becomes wet, you’ve likely found the source of the leak.Fixing Minor Leaks
Minor leaks often originate from loose fittings or valves. Tightening these connections can sometimes solve the problem. Use a wrench to gently secure any loose parts. Be cautious not to overtighten, as this could cause more damage. If tightening doesn’t stop the leak, check the pressure relief valve. This valve can sometimes malfunction, causing water to escape. If you suspect this is the case, consider replacing the valve. Replacement valves are generally affordable and available at most hardware stores. Ever tackled a leak and realized it was more than you bargained for? Sometimes, what seems minor can indicate a bigger issue. If a simple fix doesn’t resolve the leak, it might be time to consult a professional. Ensuring your water heater is functioning properly will provide peace of mind and prevent unexpected surprises. Remember, a proactive approach to maintenance can save you from costly repairs down the line.Unusual Noises
Water heaters should operate quietly. Unusual noises can signal problems. Rheem water heaters may sometimes make strange sounds. These noises often indicate underlying issues. Address these sounds to ensure safety and efficiency.
Rumbling Sounds
Rumbling sounds often mean sediment buildup. This sediment settles at the bottom. It can cause uneven heating. Water trapped under the sediment boils and creates noise. Flushing the tank can help. Regular maintenance prevents sediment problems.
Hissing Noises
Hissing noises might suggest a leak. Check for water escaping from the tank. Inspect connections and valves closely. A hissing sound can also mean excessive pressure. The pressure relief valve might be faulty. Regular inspections can help detect issues early.

Credit: www.youtube.com
Error Codes
Encountering error codes on a Rheem water heater signals specific issues needing attention. Identifying these codes aids in troubleshooting problems efficiently. Prompt action helps maintain optimal performance and extend the heater’s lifespan.
When your Rheem water heater starts flashing error codes, it can be frustrating. These codes are like secret messages from your device, telling you exactly what’s wrong. Understanding them can save you time and possibly money. So, how do you decipher these mysterious numbers?Interpreting Codes
Each error code on your Rheem water heater is a key to understanding what’s happening inside the machine. They usually appear on the digital display and are meant to guide you in identifying specific issues. Imagine the codes as a language your heater uses to communicate its needs. For example, an error code like “E1” might indicate a problem with the ignition. By knowing what these codes mean, you can take immediate action. It’s like having a direct line to the heater’s thoughts. Have you ever wished your devices could just tell you what they need? Well, now they can.Common Error Solutions
Once you interpret the error codes, you need solutions. Let’s say your heater shows an “E2” code, indicating a sensor issue. You don’t need a degree in engineering to tackle this. Often, resetting the device can clear minor glitches. Sometimes, checking for loose connections or cleaning sensors can be all it takes. I remember when my heater displayed an “E5” code, signaling a pressure problem. A simple adjustment of the pressure valve fixed it. Are you ready to take control of your water heater’s quirks? Understanding and addressing these codes can make a world of difference. It’s empowering to solve these issues without calling in an expert every time.Maintenance Tips
Proper maintenance of your Rheem water heater ensures its longevity and efficiency. Regular checks and cleaning can prevent sudden breakdowns. These simple maintenance tips help keep your water heater in top shape.
Regular Inspection
Inspect your water heater every month. Look for leaks or unusual noises. Check the pressure relief valve for proper function. Ensure no rust or corrosion on the unit. A visual inspection can identify problems early. This saves on costly repairs later.
Sediment Flushing
Flush the tank annually to remove sediment build-up. Sediment reduces the heater’s efficiency. Attach a hose to the drain valve. Direct the hose to a safe drainage area. Open the valve and let the water flow. This process clears the sediment. Ensure the heater is off and water is cool before starting. Regular flushing extends the heater’s life.
Professional Help
Seeking professional help for Rheem water heater troubleshooting can save time and stress. Experts identify issues quickly, ensuring efficient repairs and preventing further damage. This approach guarantees safety and prolongs the heater’s lifespan.
Dealing with a malfunctioning Rheem water heater can be a frustrating experience. While some minor issues can be resolved on your own, there are times when seeking professional help is the best course of action. Knowing when to call in an expert can save you time, money, and prevent further damage to your appliance.When To Call A Technician
There are specific scenarios where it’s wise to call a technician. If your water heater is leaking, producing strange noises, or not heating water consistently, it’s time to consider professional assistance. You might think these are minor issues, but they can escalate quickly. Have you ever tried fixing a leaky faucet only to find water pooling on your floor the next day? Similarly, a small issue with your water heater can lead to bigger problems if not addressed promptly. If you’re unsure about the cause of the problem, a professional can diagnose and fix it efficiently.Choosing The Right Professional
Finding the right professional is crucial for a successful repair. Start by checking reviews online and asking for recommendations from friends or family. A licensed technician with good reviews is usually a safe bet. Consider their experience with Rheem water heaters specifically. Not all technicians are familiar with every brand or model, and choosing someone who is can make a big difference in the quality of service. Price is important, but it shouldn’t be your only deciding factor. Sometimes, paying a bit more for a reputable professional saves you money in the long run by ensuring the job is done right the first time. Would you trust just anyone with your car’s maintenance, or do you prefer someone who knows your make and model? The same logic applies to your water heater. Choose wisely and ensure peace of mind.Safety Precautions
Working with Rheem water heaters requires attention to safety. Ensuring safety protects you from potential hazards. Always prioritize safety measures before starting any troubleshooting.
Handling Gas Heaters
Gas heaters need careful handling. Turn off the gas supply first. This prevents accidental gas leaks. Use a gas detector to check for leaks. Avoid using open flames near the heater. Ensure proper ventilation in the area. Wear protective gloves and goggles for safety. Gas can be dangerous if mishandled.
Electrical Safety
Electric water heaters require electrical safety steps. Disconnect the power supply before working. This avoids electrical shocks. Use insulated tools to prevent accidents. Check wires for damage or wear. Avoid water contact with electrical parts. Keep the area dry and clear. Follow manufacturer instructions for safety.

Credit: www.youtube.com
Conclusion
Rheem water heaters sometimes face issues. But, solutions are often simple. Regular maintenance helps prevent problems. Check the thermostat settings if water isn’t hot. Strange noises? Sediment might need flushing. Leaks usually mean a broken valve or pipe. Always switch off the power before repairs.
DIY fixes save money, but safety is key. If unsure, call a professional. Understanding your water heater can extend its life. Keep this guide handy for quick reference. You can enjoy hot water without stress.