
The RV water heater fault light indicates a problem with the heating system. This warning typically signals issues with power, water flow, or gas supply.
An RV water heater is essential for comfort during travel. When the fault light illuminates, it often creates concern for RV owners. Understanding what this warning means helps you address potential issues quickly. Common causes include electrical malfunctions, blocked vents, or insufficient water levels.
Ignoring the fault light can lead to further complications, affecting your trip. Regular maintenance and checks can help prevent these problems. Knowing how to troubleshoot your RV water heater ensures you stay prepared and enjoy hot water whenever needed. Stay informed to keep your RV in top shape and avoid unexpected breakdowns.
Credit: www.reddit.com
Page Contents
- 1 Introduction To Rv Water Heater Issues
- 2 Identifying The Fault Light Indicator
- 3 Initial Checks Before Troubleshooting
- 4 Troubleshooting Power Supply Problems
- 5 Inspecting The Gas Supply Line
- 6 Examining The Ignition System
- 7 Thermostat And Eco Checks
- 8 Dealing With Water Quality Issues
- 9 Advanced Diagnostics
- 10 Preventative Maintenance Tips
- 11 Troubleshooting In Special Conditions
- 12 Frequently Asked Questions
- 13 Conclusion
Introduction To Rv Water Heater Issues
RV water heaters are essential for comfort during trips. Fault lights indicate problems that need fixing. Recognizing these signs is key to avoiding bigger issues.
Common signs of trouble include:
- Flashing light on the control panel.
- No hot water when needed.
- Strange noises from the heater.
- Water leaks around the unit.
Timely troubleshooting can save money and stress. Addressing issues early helps maintain your RV’s performance. Regular checks ensure a pleasant camping experience.
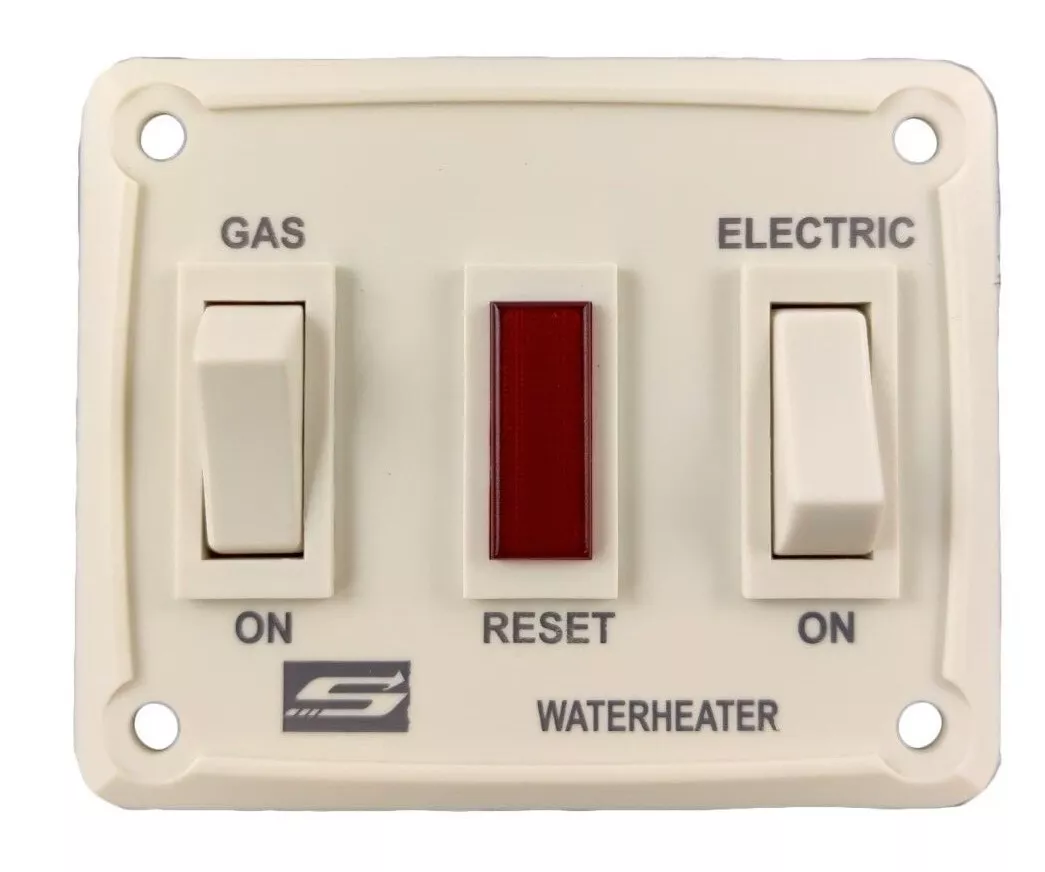
Identifying The Fault Light Indicator
The fault light indicator on your RV water heater is important. It alerts you to problems. Understanding the fault light can help you fix issues quickly.
A steady light often means the heater is not working correctly. A blinking light usually indicates a temperature issue. Sometimes, the light can mean a lack of gas or electrical problems.
Check the owner’s manual for specific meanings. Regular maintenance can also prevent these issues. Inspect the heater regularly to ensure it operates efficiently.
Initial Checks Before Troubleshooting
Before starting any work, ensure safety is your top priority. Always wear protective gear like gloves and goggles. Make sure to turn off the power supply to the water heater. This step helps prevent accidents and ensures a safe environment.
Gather the necessary tools. A multimeter is essential for checking electrical connections. Use a screwdriver set to access the heater’s components. A flashlight helps illuminate dark areas. Having towels nearby can assist with any spills.
| Tool | Purpose |
|---|---|
| Multimeter | Check electrical connections |
| Screwdriver Set | Access components |
| Flashlight | Illuminate dark areas |
| Towels | Handle spills |
Troubleshooting Power Supply Problems
Checking electrical connections is important. Start by examining all wires and plugs. Ensure they are secure and free from damage. Look for any signs of corrosion or wear. These issues can stop the water heater from working.
Next, test for adequate voltage. Use a multimeter to measure voltage at the water heater. The reading should be between 110 to 120 volts for proper operation. Low voltage can cause the fault light to turn on. If the voltage is low, check the power source and circuit breakers.
Inspecting The Gas Supply Line
Check the gas supply line for any issues. Make sure there is proper gas flow. A blocked line can cause problems. Inspect the line for any kinks or bends. These can restrict gas movement.
Next, examine the line for leaks. Use soapy water to check for bubbles. If bubbles appear, there is a leak. Make sure to tighten any loose connections. Replacing damaged parts is important for safety.
Always remember to turn off the gas before any inspection. This keeps you safe during the process. Regular checks can help avoid bigger issues in the future.
Examining The Ignition System
Cleaning the burner assembly is important for proper RV water heater function. Remove any dirt or debris that may block the burner. A clean burner ensures efficient fuel combustion and better heating performance.
Inspecting the igniter and electrode is crucial. Check for cracks or damage on the igniter. A damaged igniter can prevent the heater from starting. Ensure that the electrode is clean and properly aligned for effective spark generation.
| Component | Check For | Action |
|---|---|---|
| Burner Assembly | Dirt, Debris | Clean Thoroughly |
| Igniter | Cracks, Damage | Replace if Damaged |
| Electrode | Cleanliness, Alignment | Adjust and Clean |
Thermostat And Eco Checks
Testing the thermostat is important for your RV water heater. Start by turning off the power. Remove the access panel to reach the thermostat. Use a multimeter to check the continuity. A reading of zero ohms means it works. If there’s no reading, the thermostat is faulty.
Resetting the ECO (Emergency Cut Off) can fix some issues. Locate the ECO switch on the water heater. Push the reset button firmly. You should hear a click. Wait a few minutes and check if the fault light goes off.
Regular checks can ensure your RV water heater runs well. Keeping the thermostat and ECO in good shape helps avoid problems.
Dealing With Water Quality Issues
Flushing the tank helps keep your RV water heater clean. Regular flushing removes sediment that can build up over time. This sediment can cause issues with heating and efficiency. Flush the tank at least once a year.
To flush the tank, follow these steps:
- Turn off the power and water supply.
- Open the drain valve and let the water flow out.
- Close the valve after flushing.
- Refill the tank with fresh water.
Preventing sediment build-up is essential for performance. Use a water filter to reduce impurities. This can help maintain the quality of water in your RV. Regular maintenance ensures a long-lasting water heater.
Advanced Diagnostics
Advanced diagnostics help identify issues with your RV water heater. Utilizing diagnostic tools can quickly pinpoint problems. Check the fault light to understand the issue better.
Common tools include multimeters and pressure gauges. These tools measure voltage and water pressure effectively. Always follow the user manual for your specific model.
If problems persist, seeking professional help is essential. Certified technicians have the training and experience needed. They can ensure your RV water heater works safely and efficiently.
Signs to call a pro include unusual noises or persistent faults. Ignoring these signs can lead to bigger issues. Protect your investment by addressing problems quickly.

Credit: m.youtube.com
Preventative Maintenance Tips
Establish a regular maintenance schedule for your RV water heater. Check the manual for specific recommendations. Clean the burner assembly and vent to ensure proper operation. Inspect the anode rod every six months. Replace it as needed to prevent corrosion.
For long-term care, flush the tank annually to remove sediment buildup. This keeps your water heater efficient. Monitor the temperature settings; maintain them at safe levels to avoid overheating.
Check for leaks around the water heater. Early detection can save money and time. Always keep the area around the water heater clean and free of debris.
Troubleshooting In Special Conditions
RV water heaters can act differently in high altitudes. The air is thinner, which affects combustion. Adjust the burner for proper flame. Check the manual for specific altitude settings.
Cold weather can also impact performance. Insulate the water heater to prevent freezing. Use a tank heater for extra warmth. Make sure to check the thermostat settings regularly.
Keep an eye on the fault light. A flashing light may indicate low pressure or flame failure. Address these issues quickly to avoid further problems.
Credit: www.ebay.com
Frequently Asked Questions
How Do I Reset My Rv Water Heater?
To reset your RV water heater, locate the reset button on the unit. Press and hold the button until it clicks. Ensure the power supply is on. Check the thermostat settings and inspect for any leaks. Wait for a few minutes, then test the hot water supply.
What Does Dsi Fault Mean On My Rv Water Heater?
A DSI fault on your RV water heater indicates a problem with the direct spark ignition system. This may result from a faulty igniter, gas supply issues, or wiring problems. Check the owner’s manual for troubleshooting steps or consult a professional for repairs.
What Does “fault” Mean In Rv?
In RV terminology, “fault” refers to a defect or malfunction in the vehicle’s systems. This can include electrical issues, mechanical failures, or problems with appliances. Identifying faults is crucial for ensuring safety and functionality during travel. Regular maintenance helps prevent these issues from arising.
What Does Red Light On Rv Water Heater Mean?
A red light on your RV water heater typically indicates a problem. This could mean issues with ignition, overheating, or an empty gas tank. Check the manual for specific troubleshooting steps. Regular maintenance can prevent these issues from occurring. Always ensure safety first when inspecting your water heater.
Conclusion
Understanding your RV water heater fault light is essential for a smooth travel experience. Regular maintenance and prompt attention to issues can prevent bigger problems down the road. Always consult your owner’s manual for specific guidance. Keep your RV’s water heater in top shape, ensuring enjoyable adventures wherever you go.