
You’re noticing a puddle forming under your water heater. The culprit?
A leaking cold water inlet. This issue isn’t just a minor inconvenience; it can lead to higher water bills, potential damage to your home, and a lot of frustration. But don’t worry, you’re not alone, and there’s a solution. You’ll discover the common causes behind a leaking water heater cold water inlet and learn simple, effective steps to fix it before it becomes a bigger problem.
Imagine the peace of mind knowing you can tackle this issue confidently, avoiding costly repairs and keeping your home safe. Let’s dive into the details and get your water heater back to working perfectly.

Credit: www.reddit.com
Page Contents
Identifying The Leak
Discovering a leak in the water heater’s cold water inlet demands attention. A dripping inlet might indicate a loose connection. Regular checks can prevent costly repairs and ensure efficient heater performance.
Identifying a leak in your water heater’s cold water inlet can seem daunting, but it’s an essential step in maintaining your home’s comfort and safety. A leak can lead to water damage and increased utility bills. Knowing what to look for can save you time and prevent further issues. Let’s dive into how you can spot the signs of a leak and pinpoint common leak locations.Signs Of A Leak
Have you noticed water pooling around your water heater? This could be a sign of a leak. Watch for rust or corrosion on your heater’s exterior. These are telltale signs that water is escaping from somewhere. Listen for unusual sounds like dripping or hissing. These noises often indicate that water is leaking and escaping where it shouldn’t be.Common Leak Locations
Leaks often occur at the connections. Check the junction where the cold water inlet pipe connects to the heater. Inspect the pressure relief valve. Although designed to release water when the pressure is too high, it can sometimes leak if it’s faulty. Look at the tank itself. Even a small crack or hole can lead to significant water damage. Have you considered these areas in your home inspection routine? Remember, timely detection can save you from costly repairs and headaches.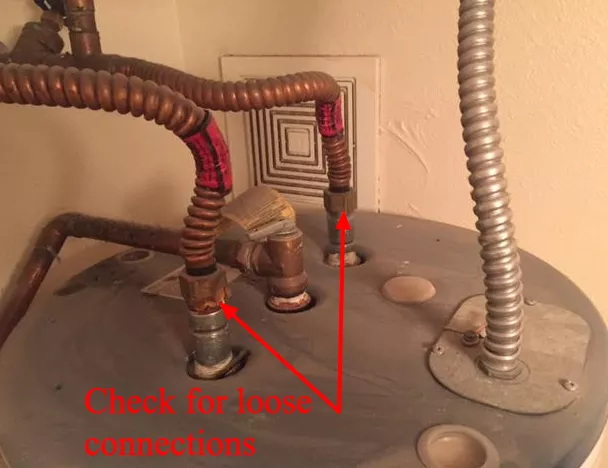
Credit: jonwayne.com
Safety Precautions
Water heater leaks can lead to significant damage and safety risks. Addressing a cold water inlet leak requires careful attention. Following safety precautions is vital to avoid accidents and ensure effective repairs. This section covers essential safety steps to take when dealing with a water heater cold water inlet leaking.
Turning Off Power
Before addressing the leak, turn off the power. If your heater is electric, locate the circuit breaker. Switch it off to cut power. For gas heaters, set the thermostat to the “pilot” setting. This step prevents electrical hazards or gas leaks. Safety first.
Shutting Off Water Supply
Next, shut off the water supply. Locate the cold water inlet valve, often on top of the heater. Turn it clockwise to close it. This stops water flow and reduces pressure. It’s essential for a safe and controlled repair process.
Tools And Materials
Fixing a leaking cold water inlet on a water heater requires certain tools and materials. Essential items include a wrench, plumber’s tape, and replacement parts if needed. Ensure safety by turning off the water and power before starting any repairs.
When your water heater’s cold water inlet starts leaking, it can be a frustrating problem to tackle. But with the right tools and materials, you can handle this issue efficiently and effectively. Knowing what you need ahead of time saves you from multiple trips to the hardware store and makes the repair process smoother. Let’s dive into the essential tools and materials you need to fix a leaking cold water inlet on your water heater.Essential Tools
Having the right tools on hand is crucial. A pipe wrench is indispensable for loosening and tightening the fittings. It provides the necessary grip and leverage needed for stubborn connections. A basin wrench can reach awkward spots where other wrenches can’t. It’s particularly useful when space is tight around your water heater. Plumbers tape, also known as Teflon tape, is a must-have. It’s used to seal pipe threads and prevent future leaks. This simple tool can save you from more complex repairs down the line. You might also need a screwdriver if there are any screws involved in securing the inlet or surrounding parts. Be sure to have both flathead and Phillips types at your disposal.Required Materials
Before you start the repair, gather all necessary materials. Replacement washers are often required, especially if the old ones are worn out. They’re a small but critical component in preventing leaks. You may need to have some new fittings in case the existing ones are damaged beyond repair. Always check the size and type to match your current setup. Pipe sealant can be a lifesaver. It helps ensure a watertight seal, particularly in areas where plumbers tape might not suffice. It’s also wise to have a bucket or a towel handy to catch any water that might spill during the repair. This will keep your workspace tidy and prevent additional cleanup. Do you have any personal experiences with water heater repairs? Perhaps you’ve tried a quick fix that worked wonders or learned something the hard way. Share your stories in the comments! Your insights might just help someone else facing the same issue.
Credit: diy.stackexchange.com
Step-by-step Repair
Dealing with a leaking water heater cold water inlet can be stressful. But you can fix it yourself with the right steps. This guide will walk you through the repair process. You can save money and time by following these simple steps.
Inspecting Connections
Begin by turning off the power and water supply. Safety first. Look closely at the water inlet connections. Examine for signs of corrosion or loose fittings. Corrosion may indicate a bigger issue. Use a flashlight for better visibility. Ensure you inspect all visible parts. A small leak can lead to bigger problems.
Tightening Loose Fittings
Loose fittings often cause leaks. Use a wrench to tighten them carefully. Don’t over-tighten, as this can cause damage. Check each fitting systematically. After tightening, turn on the water supply. Observe if the leak persists. Sometimes, tightening solves the problem immediately.
Replacing Faulty Parts
If tightening doesn’t work, the part might be faulty. Identify the specific part causing the leak. It could be a valve or a connector. Purchase a replacement from a hardware store. Follow manufacturer instructions for installation. Ensure the new part fits securely. After replacement, test the system by turning on the water. This step is crucial to confirm the fix.
Testing The Repair
A leaking cold water inlet on a water heater needs careful testing. Ensure all connections are tight and secure. Observe for any drips or moisture around the inlet valve to confirm the repair’s success.
Testing the repair of your water heater cold water inlet is crucial. It ensures the fix is reliable and prevents future leaks. After completing the repair, follow these steps to make sure everything works smoothly. Testing the repair process involves restoring the water supply and checking for leaks.Restoring Water Supply
First, turn the water supply back on. Slowly open the main water valve. This prevents sudden pressure surges. Listen carefully for any unusual sounds. These could indicate trapped air. Allow the system to stabilize for a few minutes. Check the water flow in the nearest faucet. Ensure it’s steady and clear. This confirms the water supply is restored correctly.Checking For Leaks
Next, inspect the repair area for any signs of leakage. Use a dry cloth to wipe the connections. This helps in spotting any dampness. Look closely at the cold water inlet. Pay attention to any drips or moisture. Tighten connections if necessary. Use a flashlight to see in dim areas. Even a small leak can cause bigger issues later. Testing your repair now saves time and resources.Preventive Measures
Detect leaks early to prevent damage. Regularly inspect your water heater’s cold water inlet for signs of leakage. Tighten loose fittings and replace worn-out parts to ensure efficient performance and extend the lifespan of your appliance.
Preventive measures for a leaking cold water inlet in your water heater can save you from potential headaches and unexpected expenses. A small leak might seem harmless, but ignoring it could lead to bigger issues like water damage or increased energy bills. By adopting a few simple practices, you can maintain your water heater and keep it functioning efficiently.Regular Maintenance
Regular maintenance is crucial for preventing leaks in your water heater. It involves simple tasks that can be done monthly or annually. Check for any signs of rust or corrosion on the pipes. Rust can weaken the material and cause leaks. If you notice any, you might need to replace the affected parts. Flush your water heater at least once a year. This removes sediment buildup that can cause blockages and increase pressure, leading to leaks. You can do this by turning off the heater, attaching a hose to the drain valve, and letting the water flow out.Monitoring Water Pressure
Monitoring your water pressure is another effective way to prevent leaks. High water pressure can stress your pipes and joints, leading to leaks over time. Install a pressure gauge to keep an eye on your water pressure. Ideally, it should be between 40 and 60 psi. If it’s higher, consider installing a pressure regulator. I remember a friend who ignored high water pressure in her home. Within months, she faced a burst pipe and costly repairs. Don’t let this happen to you. Regularly check your pressure and adjust as needed. Have you ever considered how your daily routines might affect your water heater? Small habits like checking for leaks or monitoring pressure can make a huge difference. What steps can you take today to protect your water heater and prevent unexpected issues?Frequently Asked Questions
Why Is My Water Heater Cold Water Inlet Leaking?
A leaking cold water inlet can result from loose connections or corrosion. Check the inlet pipe for any visible damage or wear. Tightening loose connections might solve the problem. If corrosion is evident, consider replacing the affected parts. Regular maintenance helps prevent such issues.
How Do I Fix A Leaking Cold Water Inlet?
To fix a leaking cold water inlet, first turn off the water supply. Tighten any loose connections using a wrench. If the leak persists, inspect for corrosion or damaged parts. Replace these if necessary. Ensure all connections are secure before turning the water back on.
Is It Safe To Use A Leaking Water Heater?
Using a leaking water heater isn’t safe. Leaks can cause water damage and increase energy bills. Additionally, they might lead to further damage inside the heater. It’s best to address the issue promptly by inspecting the unit and consulting a professional if needed.
Can A Leaking Inlet Cause Other Problems?
Yes, a leaking inlet can lead to increased water bills and potential water damage. It can also affect the heater’s efficiency, causing higher energy consumption. Addressing leaks early can prevent further complications and maintain your water heater’s performance.
Conclusion
Fixing a leaking water heater inlet can be simple. First, identify the leak’s source. Then, tighten any loose connections. Often, a worn-out washer causes leaks. Replace it if necessary. Regular maintenance prevents future leaks. Keep an eye on your water heater regularly.
Ensure all connections are secure. This helps in avoiding bigger issues later. Leaks waste water and energy. Address them quickly to save costs. Remember, a well-maintained heater lasts longer. And provides consistent hot water. Stay proactive, and keep your water heater in top shape.