
Are you noticing unusual leaks around your water heater? Or perhaps you’re hearing strange noises?
These could be signs that your water heater’s pressure relief valve needs attention. This small yet crucial component ensures your water heater operates safely and efficiently. Without it, there’s a risk of dangerous pressure build-up. But don’t worry, installing a new pressure relief valve isn’t as daunting as it sounds.
In this guide, you’ll discover straightforward steps to handle the installation with confidence. Imagine the peace of mind knowing your home is safe and your water heater is running smoothly. Dive into the details, and let’s ensure your water heater is in tip-top shape!
Page Contents
Importance Of Pressure Relief Valves
Proper installation of a water heater pressure relief valve is crucial. It prevents excess pressure buildup, ensuring safety. This valve protects against potential damage by releasing excess pressure, safeguarding your home and ensuring efficient water heater operation.
When was the last time you thought about your water heater’s pressure relief valve? If you’re like most homeowners, it’s probably not often. Yet, this small component plays a crucial role in maintaining the safety and efficiency of your water heater system. Ignoring its importance can lead to unexpected and costly consequences.What Is A Pressure Relief Valve?
A pressure relief valve is a safety device installed on your water heater. Its primary function is to prevent excess pressure from building up inside the tank. When pressure levels get too high, this valve releases water, ensuring your tank doesn’t burst or leak.Why You Should Care About It
Imagine waking up to a flooded basement because of a burst water heater. It’s not just about the mess; it’s about the damage to your home and belongings. A functioning pressure relief valve can prevent such disasters. By releasing excess pressure, it averts potential hazards and extends the life of your water heater.How Often Should You Check It?
Regular maintenance is key. Aim to check your pressure relief valve at least once a year. A simple test involves lifting the valve’s lever to ensure it releases water. If it doesn’t, it might be time for a replacement.Potential Risks Of Neglect
Ignoring your pressure relief valve can be risky. High pressure can cause the water heater to rupture, leading to significant property damage. Moreover, the risk of scalding from excessively hot water is real and dangerous. Is it worth risking your safety and that of your family?Installation Tips For Homeowners
Installing a pressure relief valve isn’t rocket science, but it requires attention to detail. Ensure the valve is compatible with your water heater model. Use a pipe wrench to secure it tightly and check for any leaks. If unsure, don’t hesitate to call in a professional.Personal Experience: A Lesson Learned
Last winter, I neglected my water heater’s pressure relief valve, thinking it wasn’t a priority. One chilly morning, a pool of water greeted me in the basement. That was my wake-up call. After replacing the valve, I learned firsthand the value of regular checks. It’s a small step that saved me from a much larger headache.Final Thoughts
Are you willing to risk the safety of your home by ignoring such a simple device? Taking a few minutes to ensure your pressure relief valve is functioning can save you time, money, and stress. Make it a routine check in your home maintenance schedule. Your peace of mind is worth it.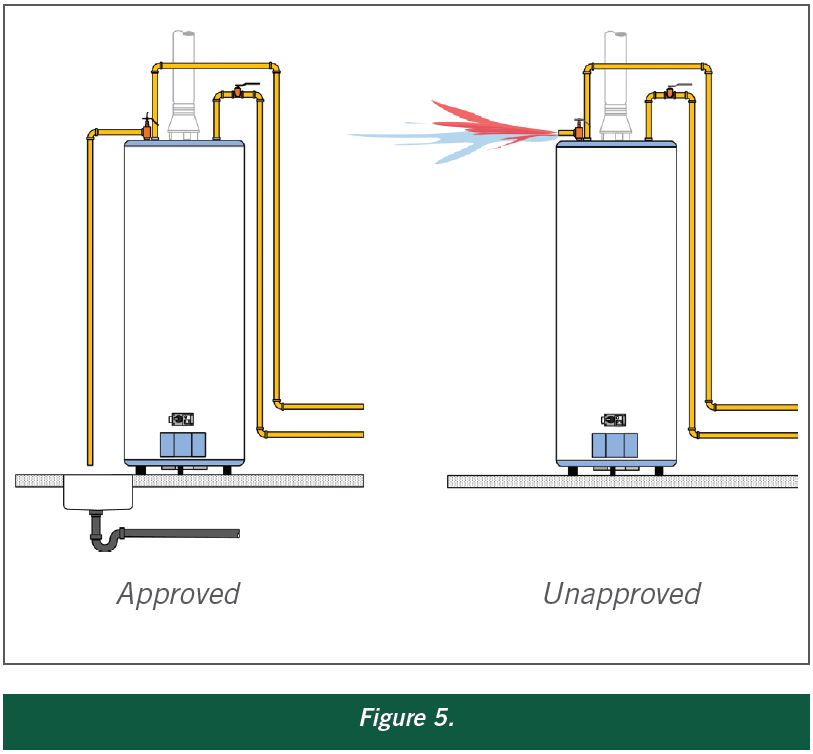
Credit: www.iccsafe.org
Identifying The Right Valve
When it comes to installing a water heater pressure relief valve, identifying the right valve is crucial. The pressure relief valve is a safety device that prevents excess pressure from building up in your water heater tank. Choosing the correct valve not only ensures your safety but also enhances the efficiency of your water heater. So, how do you go about finding the right valve?
Types Of Pressure Relief Valves
There are several types of pressure relief valves available. The most common are spring-loaded valves and diaphragm valves. Spring-loaded valves are popular because they are simple and reliable. They open automatically when the pressure exceeds a set limit. Diaphragm valves, on the other hand, use a flexible membrane to control pressure. This type is often used in systems where pressure changes frequently.
Have you ever wondered why one type might be better for your home than another? If your water heater experiences frequent pressure fluctuations, a diaphragm valve might be more suitable due to its responsive nature. But if you prefer a straightforward solution with minimal maintenance, a spring-loaded valve might be your best bet.
Selecting The Appropriate Size
Choosing the right size for your pressure relief valve is equally important. The size of the valve must match the capacity of your water heater. If the valve is too small, it might not relieve pressure effectively. If it’s too large, it could lead to unnecessary water discharge, wasting energy and resources.
To determine the correct size, check your water heater’s specifications. They usually provide guidance on the appropriate valve size. If you’re unsure, consulting with a professional can offer clarity and peace of mind. Imagine the relief of knowing that your water heater is equipped with the perfect valve, optimizing both safety and performance.
Have you considered the implications of selecting the wrong valve? It can lead to costly repairs or even dangerous situations. So, take the time to identify the right valve for your needs. Your water heater—and your peace of mind—will thank you.
Tools And Materials Needed
Installing a water heater pressure relief valve requires basic tools and materials. Gather a wrench, Teflon tape, and a new valve. Ensure you have a bucket for draining water.
Installing a water heater pressure relief valve is an essential task that ensures the safety and efficiency of your heating system. To successfully complete this installation, you need specific tools and materials. Having the right equipment not only makes the job easier but also guarantees a professional finish. Let’s dive into what you’ll need for this project.Tools Required
Before you start, gather all necessary tools. A pipe wrench is crucial for tightening and loosening nuts and bolts. You might also need a hacksaw to cut through any existing pipe that obstructs the valve installation. Don’t forget a tape measure to ensure precise fittings. A plumber’s tape is also handy for sealing joints and preventing leaks. If you’ve ever installed plumbing fixtures before, you know how annoying leaks can be.Materials Needed
First on the list is the pressure relief valve itself. Make sure you purchase one that matches your water heater’s specifications. This ensures compatibility and proper functionality. Copper or PVC pipes might be necessary, depending on your heater and existing plumbing. Pick the type that suits your current setup. You’ll want durable pipes that withstand pressure without cracking. Consider purchasing a discharge tube to safely direct water flow. This tube prevents water from spilling onto the floor, which can cause damage over time. Safety should always be your priority.Safety Gear
Safety is a key component of any installation process. Equip yourself with gloves to protect your hands from sharp edges. Donning safety goggles shields your eyes from splashes and debris. A dust mask may be required if you are cutting pipes. Have you ever tried cutting without one? The particles can be quite bothersome.Additional Supplies
It’s always wise to have extra supplies on hand. Purchase additional pipe fittings and connectors. They come in handy if your initial measurements are off or if you encounter unexpected challenges. A bucket or pan can be useful for catching water during the installation process. You wouldn’t want water to damage your flooring, would you? Are you prepared with all these tools and materials? Missing even one item could delay your project. Double-check your list and ensure you’re ready to tackle this installation with confidence.
Credit: www.youtube.com
Safety Precautions
Ensure the water heater pressure relief valve is installed correctly for safety. Regularly check for leaks and blockages. Always follow manufacturer guidelines to prevent accidents and ensure efficient operation.
When installing a water heater pressure relief valve, safety should be your top priority. It’s easy to overlook potential hazards in the rush to get things done. But taking a moment to understand and implement essential safety precautions can make all the difference. You don’t want to risk injury or damage, so let’s dive into some practical steps to keep you safe.Handling Hot Water
Dealing with hot water can be risky. Always ensure the water heater is off and cooled down before starting your work. You might be tempted to rush, but patience here is key. Use protective gloves to shield your hands from any residual heat. If you’ve ever underestimated the heat of a cup of coffee, you know how deceiving temperatures can be. This small step can save you from unnecessary burns. Keep a bucket handy to catch any hot water that might spill during installation. A little preparation can prevent a big mess and a potential hazard.Preventing Burns And Scalds
Burns and scalds are no joke—they can cause serious injury. Make sure your work area is clear of any obstacles that could lead to accidental slips or spills. Check the thermostat settings on your water heater. If it’s set too high, the risk of scalding increases. Adjust it to a safe temperature before beginning your installation. Have you ever touched a hot kettle without thinking? It’s a painful reminder of how quickly accidents happen. Keep a first aid kit nearby, just in case. It’s better to be over-prepared than caught off guard. Taking these safety precautions might seem tedious, but they are crucial. Why risk your well-being when a few simple steps can keep you safe? Your safety is worth the extra effort.Steps For Installation
Begin by turning off the water supply and draining the tank. Carefully remove the old valve using a wrench. Install the new pressure relief valve by screwing it into place. Ensure it is tightly sealed to prevent leaks. Finally, turn the water supply back on to check the installation.
Installing a water heater pressure relief valve might seem like a daunting task, but it can be quite straightforward if you follow the right steps. Proper installation ensures safety and efficiency, preventing potential hazards such as leaks or even explosions. This guide will walk you through each step with simplicity and clarity, helping you ensure a smooth process. Ready to tackle this project? Let’s dive into the practical steps you need to follow.Shutting Off Power And Water Supply
First, ensure your safety by shutting off the power supply to your water heater. If it’s electric, switch off the circuit breaker. For gas heaters, turn the gas valve off. This prevents any electrical shock or gas leakage. Next, turn off the water supply. Locate the water shut-off valve near your heater and twist it clockwise. This stops water flow, allowing you to work without any mess or flooding. Have you ever tried fixing a leak while water is gushing out? It’s not fun!Removing The Old Valve
Once the power and water are off, you can remove the old valve. Use a wrench to unscrew the relief valve from the heater. Be careful, as residual water may spill out. Check the old valve for signs of rust or damage. These issues can indicate potential problems in your water heater. Are you seeing any concerning signs? If so, it might be time for a professional inspection.Installing The New Valve
Position the new valve and thread it into the heater’s opening. Turn it clockwise to ensure it’s securely fastened. Use the wrench for a tight fit, but avoid overtightening. Test the valve by turning the water and power back on. Listen for any unusual sounds or leaks. Does everything seem in order? If yes, congratulations on a successful installation! Remember, regular maintenance is crucial. A properly installed valve keeps your water heater functioning safely and efficiently. Have you scheduled your next check-up yet?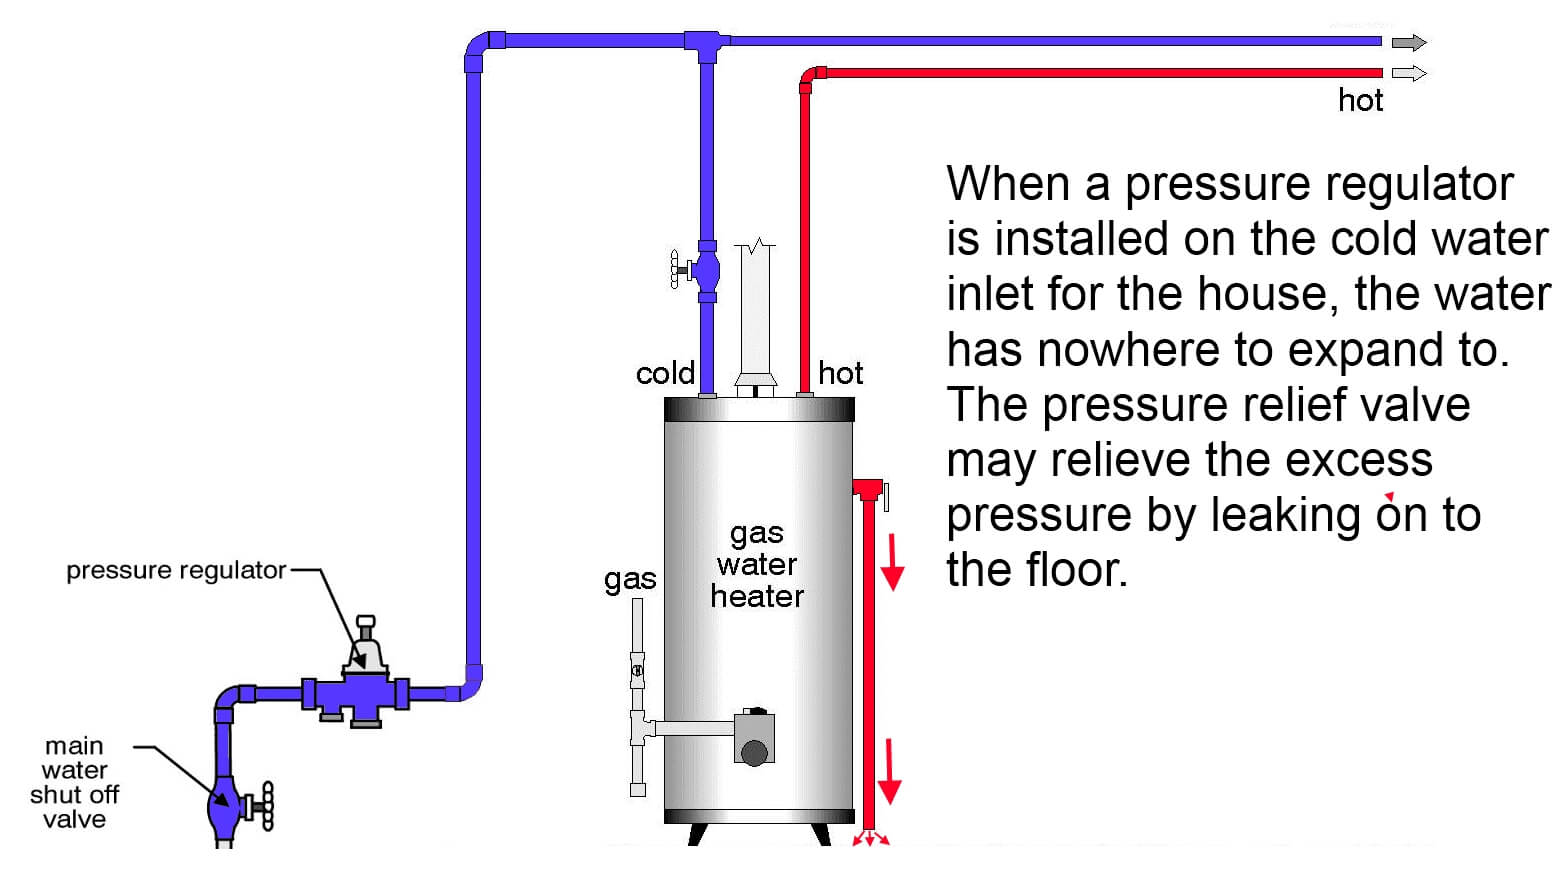
Credit: www.greensafaris.com
Testing The Installation
Testing the installation of a water heater pressure relief valve ensures safety and proper function. This essential step prevents leaks and maintains optimal pressure, protecting the system from damage. Regular checks can extend the lifespan of your water heater.
Testing the installation of your water heater pressure relief valve is a crucial step to ensure safety and efficiency. Once the valve is installed, confirming that it’s working correctly can prevent potential problems like leaks or malfunctions. Let’s dive into how you can test your installation effectively to guarantee peace of mind.Checking For Leaks
After installation, the first thing you should do is check for leaks. Turn on the water supply and observe the area around the valve. Even a small amount of moisture can indicate an issue. If you notice any leaks, tighten the connections slightly and check again. It’s important to address leaks immediately to avoid water damage or inefficiencies in your system. Don’t forget to also inspect the surrounding pipes. Sometimes, what appears to be a valve issue can actually be a pipe problem.Ensuring Proper Functionality
The next step is to ensure the valve functions as it should. Lift the valve’s test lever and let a small amount of water release. This action confirms that the valve can relieve pressure when necessary. Listen for a hissing sound, which is a good sign that the valve is venting steam or hot water properly. If you don’t hear anything or if water doesn’t flow, there might be a blockage or installation error. Ask yourself: Is the water flowing smoothly without any irregularities? If not, it might be time to consult a professional for further inspection. Testing your installation isn’t just about ticking boxes; it’s about safeguarding your home from potential risks. Have you ever faced a challenge with a faulty installation? How did you handle it? Your experience might just save someone else from a similar situation.Troubleshooting Common Issues
Installing a water heater pressure relief valve can prevent leaks and ensure safety. Check the valve’s tightness and alignment. Proper installation helps avoid potential hazards and maintains efficiency.
Troubleshooting common issues with your water heater pressure relief valve can save you time, money, and a whole lot of frustration. Whether you’re dealing with leaks or unusual noises, understanding the underlying problems and knowing how to fix them is crucial. Let’s dive into some specific challenges you might face.Dealing With Leaks
Leaks in your water heater pressure relief valve can be a pesky problem. You might notice water pooling at the base of your heater. This could be due to a faulty valve or excessive pressure in the tank. Check the valve for any visible damage or corrosion. If the valve appears intact, test the tank’s pressure. A pressure reading that’s too high indicates a need for pressure regulation. Consider replacing the valve if it’s damaged. If the pressure is the issue, adjusting the pressure setting or consulting a professional might be necessary.Addressing Unusual Noises
Unusual noises from your water heater can be both annoying and concerning. These sounds often stem from sediment build-up or air in the system. Flush the tank to remove any sediment. This simple task can drastically reduce noise and improve efficiency. If the noise persists, inspect the valve for any signs of wear or damage. A faulty valve might need replacing to restore peace and quiet. Have you ever ignored a strange noise only for it to become a bigger issue later? Don’t let that happen with your water heater. Addressing these noises early can prevent costly repairs down the line.Maintenance Tips
Maintaining your water heater pressure relief valve ensures safe and efficient operation. Regular upkeep prevents leaks and prolongs the lifespan of your system. Follow these simple maintenance tips to keep your valve in top condition.
Regular Inspection
Check your valve every six months for signs of wear or damage. Look for drips or water stains around the valve. Ensure there are no obstructions blocking the valve’s discharge pipe. Listen for unusual noises that may indicate a problem. A quick inspection can catch issues before they become costly repairs.
When To Replace The Valve
Replace the valve if it leaks continuously or fails to open. This indicates it may not function properly in an emergency. Change the valve if corrosion or rust is visible. A faulty valve can lead to pressure buildup and potential hazards. Always use a certified replacement part for safety.
Conclusion
Installing a pressure relief valve on your water heater is crucial. It ensures safety and prevents damage. This simple device releases excess pressure. Regular checks keep it functioning well. Always follow the manufacturer’s instructions closely. If unsure, consider consulting a professional plumber.
A secure installation protects your home. Remember, safety comes first. Proper maintenance extends your water heater’s life. Avoid unexpected issues by staying proactive. A well-installed valve gives peace of mind. You can enjoy hot water without worries. Keep your home safe and efficient.