
Are you tired of stepping into a cold shower because your water heater isn’t working properly? You might be dealing with a faulty thermocouple.
This small but crucial component ensures your water heater functions safely and efficiently. Installing a new thermocouple can seem daunting, but it doesn’t have to be. Imagine the satisfaction of fixing this issue yourself, saving money, and avoiding the hassle of calling in a professional.
In this guide, you’ll discover how straightforward water heater thermocouple installation can be. You’ll also gain the confidence to tackle this task, ensuring that hot showers are back in your daily routine. Let’s dive into the details and make sure your water heater is up and running smoothly in no time.
:max_bytes(150000):strip_icc()/replacing-water-heater-thermocouple-flame-sensor-1824918-02-c867831fe43644f0ae9b04344e18f64f.jpg)
Credit: www.thespruce.com
Page Contents
Tools And Materials Needed
Installing a water heater thermocouple can seem challenging. The right tools and materials simplify the task. Understanding what you need ensures a smooth installation process. Let’s explore the necessary tools and materials.
Essential Tools
Basic tools make the installation easier. A wrench is crucial. Use it to loosen and tighten connections. Needle-nose pliers help grasp small parts. A multimeter checks electrical connections. Confirm the thermocouple is working correctly. A screwdriver is needed. Choose one that fits your water heater screws.
Required Materials
A new thermocouple is the main component. Ensure it matches your water heater type. Teflon tape is necessary. It seals gas connections to prevent leaks. Safety gloves protect your hands during installation. Keep a flashlight nearby. It helps in low-light areas around the heater. Have a rag or cloth handy. Use it to clean surfaces or wipe spills.
Credit: www.youtube.com
Safety Precautions
Installing a water heater thermocouple might seem straightforward, but it’s crucial to prioritize safety throughout the process. Mistakes can lead to gas leaks or electrical hazards, posing serious risks. Before you dive into the installation, make sure you’re equipped with the right knowledge and tools to protect yourself and your home.
Gas Safety Measures
Working with gas requires your utmost attention. Always turn off the gas supply before starting any work. This simple step can prevent dangerous leaks.
Check for gas leaks using a soap and water solution. Apply it to the connections; bubbling indicates a leak. Address any leaks immediately.
Ensure proper ventilation in the area you’re working. This prevents gas accumulation, keeping you safe from inhalation risks.
Electrical Safety Tips
Electricity can be just as hazardous as gas. Always turn off the power supply to the water heater before beginning installation.
Use insulated tools to avoid electrical shocks. They offer a safer grip and protection while you work on connections.
Double-check all connections before restoring power. Loose wires can cause short circuits, leading to potential fire hazards.
Have you ever wondered if you’re fully prepared for such tasks? Ensuring safety requires vigilance and attention to detail. Equip yourself with the knowledge and tools, and you’ll navigate the installation process with confidence.
Identifying Thermocouple Issues
Troubleshooting water heater thermocouples involves checking for loose connections or dirt. A faulty thermocouple can lead to heating issues. Proper installation ensures efficient operation and prevents frequent problems.
Identifying issues with your water heater thermocouple can save you from cold showers and unexpected costs. The thermocouple is a critical component that acts as a safety device, ensuring that your heater functions correctly. When it fails, your water heater might stop working altogether. Understanding the signs of a malfunctioning thermocouple is crucial for timely repairs.Common Signs Of Failure
You might notice the water heater’s pilot light frequently going out. This can be a clear indication of a thermocouple problem. The pilot light is crucial for heating water, and its instability is a telltale sign. Another sign is the water not reaching the desired temperature. If your showers are lukewarm despite setting the heater to a higher temperature, the thermocouple might be the culprit. It’s essential to address these issues promptly to maintain comfort in your home. A malfunctioning thermocouple can also lead to strange noises from your water heater. Clicking or hissing sounds might indicate it’s struggling to maintain a steady flame. Pay attention to these auditory clues as they can help you diagnose problems early.Testing The Thermocouple
Testing the thermocouple is a straightforward process. First, ensure the heater is off and the area is safe to work in. Safety should always be your priority. Use a multimeter to check the voltage output of the thermocouple. A healthy thermocouple typically reads around 25 to 30 millivolts. Anything significantly lower suggests it might need replacing. Visual inspection is also key. Look for any visible wear or damage. A bent or corroded thermocouple can’t function properly, and replacement is necessary. Have you ever tried fixing a thermocouple yourself? It’s simpler than you might think, and a small investment of time can result in significant savings. Why not give it a try and see if you can resolve the issue before calling in a professional?
Credit: www.amazon.com
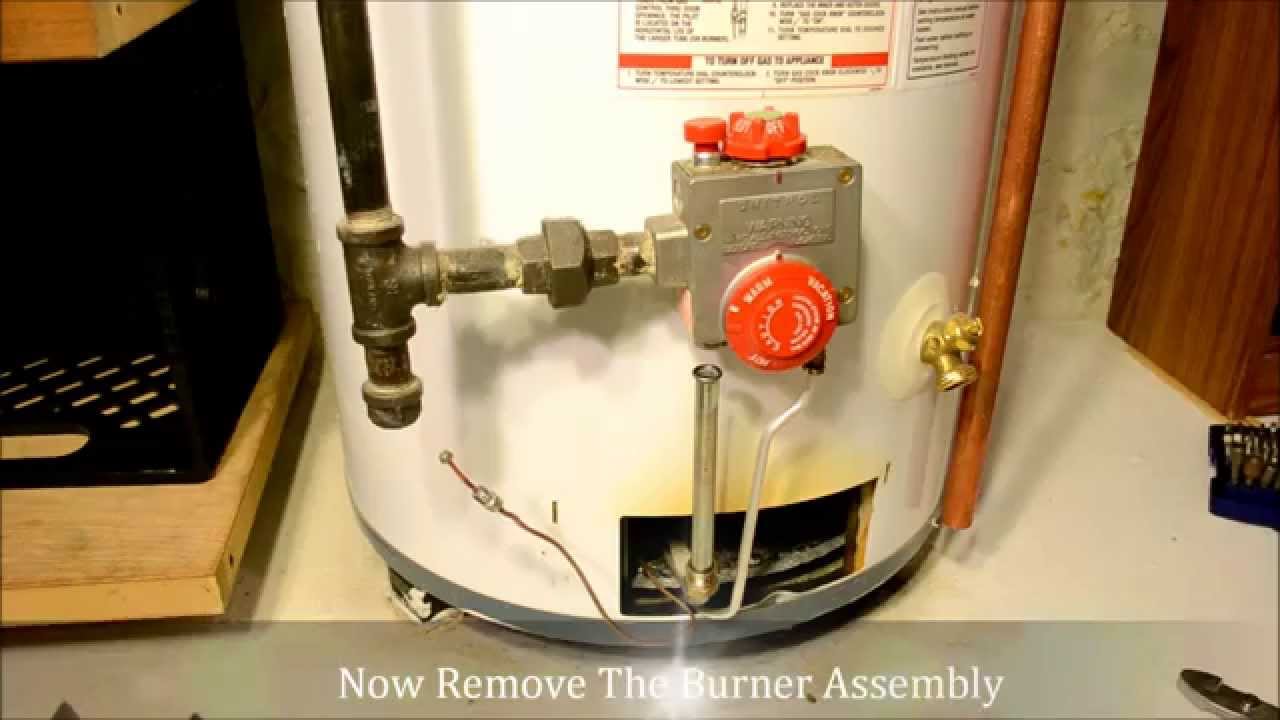
Removing The Old Thermocouple
Removing the old thermocouple from your water heater is a crucial step in ensuring your appliance operates safely and efficiently. If you’ve noticed your water heater pilot light is frequently going out, it might be time for a thermocouple replacement. This process might seem daunting, but breaking it down into manageable steps can make it straightforward. You’ll find that with some basic tools and safety precautions, you can tackle this project with confidence. Let’s get started by turning off the gas supply and disconnecting the thermocouple.
Turning Off Gas Supply
Safety should always be your top priority when working with gas appliances. Before you start, ensure the gas supply to your water heater is turned off. Locate the gas valve, which is usually found on the supply line near the base of the heater. Turn it clockwise until it stops. This will prevent any gas from flowing to the unit while you work.
Have you ever wondered why it’s necessary to turn off the gas? It’s not just about preventing leaks. Gas buildup can be dangerous. A simple twist of the valve can save you from potential hazards. After turning it off, let the water heater cool down for a few minutes. You don’t want to work on a hot unit!
Disconnecting The Thermocouple
Once the gas supply is safely off, you can proceed to disconnect the old thermocouple. You’ll need a wrench to do this. The thermocouple is connected to the gas control valve, usually with a screw. Loosen the screw and gently pull the thermocouple away from the valve.
It’s fascinating how a tiny component can affect the entire operation of your water heater. Ensure you keep track of any washers or small parts that come off during the disconnection. Losing them can lead to frustrating delays in your installation process. If you’re worried about forgetting where each piece goes, consider taking a photo before you begin.
As you remove the thermocouple, notice its condition. Is it worn out or damaged? This could be the reason your pilot light has been acting up. Remember, a well-functioning thermocouple is key to a reliable water heater. Are you ready to replace it with a new one and enjoy uninterrupted hot showers?
Installing The New Thermocouple
Replacing a thermocouple in your water heater? It’s not as hard as you think. A thermocouple is a safety device. It ensures your heater’s pilot light stays lit. Installing a new thermocouple can fix many issues. Let’s dive into the installation process.
Positioning The Thermocouple
Start by locating the pilot assembly. The thermocouple should sit close to the pilot flame. Proper positioning is crucial for accurate temperature sensing. Make sure it’s not too far or too close. This ensures the flame can easily heat the thermocouple.
Observe the old thermocouple’s placement. Use it as a guide for the new one. Slide the new thermocouple into place. Align it with the pilot flame for optimal performance.
Securing Connections
Once positioned, secure the thermocouple to the gas valve. Tighten the connection by hand first. Then, use a wrench for a snug fit. Avoid over-tightening to prevent damage.
Check all connections for stability. A loose connection can cause malfunctions. Ensuring a stable connection is essential for safety. Confirm that all other parts are secure too.
After securing, test the thermocouple. Light the pilot and observe. The flame should stay lit, indicating a successful installation.
Testing The Installation
Ensure the thermocouple connects securely to the gas valve. Confirm the pilot light stays lit. Check the water heater’s consistent operation by running hot water.
Testing the installation of a water heater thermocouple is a crucial step to ensure everything is functioning correctly. Without proper testing, you might find yourself facing cold showers or potential hazards. So, how do you make sure your installation is spot-on? The key lies in checking gas flow and monitoring the pilot light. Let’s dive into these essential tasks.Checking Gas Flow
First things first, you want to ensure that the gas is flowing correctly to your water heater. Turn on the gas valve and listen for any unusual noises. A consistent flow is what you’re aiming for. If you notice any hissing or irregular sounds, it might indicate a leak. Using a soapy solution, apply it to the connections to check for bubbles, a clear sign of a leak. This simple step can save you from potential gas-related accidents.Monitoring Pilot Light
Once the gas flow is confirmed, the next step is to keep an eye on the pilot light. A steady, blue flame is ideal. If the pilot light flickers or goes out, it could indicate a problem with the thermocouple. You might need to adjust its position or check the connections. Consider this: the pilot light is your water heater’s heart. If it’s not stable, your heater won’t function efficiently. Remember, testing the installation isn’t just about following steps—it’s about ensuring safety and efficiency. Have you ever found yourself in a cold shower despite having a water heater? Testing could be your savior.Troubleshooting Tips
Installing a water heater thermocouple might seem straightforward, but like any DIY project, it can come with its own set of challenges. Whether you’re dealing with inconsistent heating or a complete shutdown, troubleshooting your thermocouple installation can save you time and frustration. Let’s dive into some common problems and solutions.
Addressing Common Problems
One common issue is the pilot light refusing to stay lit. This can be frustrating and often indicates a thermocouple problem. Check if the thermocouple is securely connected to the gas valve. A loose connection might disrupt the signal to the heater.
Another problem could be the thermocouple’s tip not being properly aligned with the pilot flame. If it’s too far away, it won’t generate enough voltage to keep the gas valve open. Adjusting its position might solve the problem.
Sometimes, dirt or corrosion can affect the thermocouple’s performance. Regular cleaning can prevent this. Use a gentle brush to remove debris, and ensure the thermocouple is free from rust. This simple maintenance can make a big difference.
When To Seek Professional Help
Feeling overwhelmed by persistent issues? It might be time to call a professional. If you’ve tried adjusting and cleaning but still face problems, a technician can assess the situation and provide specialized solutions.
Complex issues like a faulty gas valve or electrical problems often require expert intervention. These aren’t just tricky but can also be dangerous if mishandled. Remember, safety first!
Ask yourself: Is the cost of a professional worth the peace of mind? Sometimes investing in expertise can save money in the long run by preventing future breakdowns.
Have you faced any of these issues? What solutions worked for you? Share your experiences and join the conversation in the comments below!
Maintenance And Care
Proper maintenance of your water heater thermocouple is crucial. It ensures its efficient operation and longevity. Regular care helps prevent unexpected breakdowns and costly repairs. Understanding maintenance tasks is key to keeping your system running smoothly.
Routine Inspections
Check your thermocouple regularly. Inspect for signs of wear and damage. Dust and dirt can affect its performance. Cleaning the thermocouple improves its efficiency. Use a soft cloth to wipe it gently. Ensure the connection to the gas valve is secure. Loose connections can lead to malfunction.
Observe the flame during operation. A weak flame indicates thermocouple issues. Make sure the pilot light stays lit. If it goes out frequently, inspect the thermocouple. Check the wiring for corrosion or fraying. Replace damaged wires immediately.
Extending Thermocouple Life
Keep the area around the water heater clean. Dust and debris can damage the thermocouple. Ensure proper ventilation to prevent overheating. Avoid using harsh chemicals near the heater. They can corrode the thermocouple.
Schedule annual professional inspections. Experts can detect issues early. This helps in extending the thermocouple’s life. Follow manufacturer guidelines for maintenance. Proper care can significantly enhance performance.
Consider upgrading if you notice frequent issues. Newer models may offer better reliability and efficiency. Regular attention to your thermocouple can prevent major problems.
Conclusion
Installing a water heater thermocouple isn’t complicated. It improves heater performance and safety. Follow step-by-step instructions carefully. Ensure all tools are ready before starting. Double-check connections to avoid issues later. Regular maintenance prolongs thermocouple lifespan. Save money by doing it yourself.
Simple fixes can prevent major problems. Always prioritize safety during installation. Use reliable guides or videos for assistance. Seek professional help if unsure. Enjoy consistent hot water once installed properly. Keep the heater’s manual handy for future reference. Your efforts lead to a comfortable home.