
Is your water heater acting up, leaving you with icy showers and a rising sense of frustration? It might be time to turn your attention to a small but crucial component: the thermocouple.
This tiny device plays a big role in ensuring your water heater functions smoothly, and understanding how to troubleshoot it could save you time and money. In this blog post, we’ll guide you step-by-step through the process of diagnosing and fixing common thermocouple issues.
By the end, you’ll feel empowered and confident, ready to tackle the problem head-on. Keep reading to discover the simple solutions that could restore your water heater to its former glory!
:max_bytes(150000):strip_icc()/replacing-water-heater-thermocouple-flame-sensor-1824918-hero-7ee1bb61d2a84355b3884424297996b4.jpg)
Credit: www.thespruce.com
Page Contents
- 1 Signs Of A Faulty Thermocouple
- 2 Basic Thermocouple Function
- 3 Safety Precautions
- 4 Tools Needed For Troubleshooting
- 5 Step-by-step Inspection Guide
- 6 Cleaning And Maintenance Tips
- 7 Replacing The Thermocouple
- 8 When To Call A Professional
- 9 Preventative Measures
- 10 Faqs On Thermocouple Issues
- 11 Conclusion
Signs Of A Faulty Thermocouple
Experiencing issues with water heater performance? A faulty thermocouple may be the cause. Cold water instead of hot and frequent pilot light outages indicate potential problems. Prompt attention and troubleshooting can ensure a reliable hot water supply.
When your water heater suddenly stops providing hot water, the thermocouple might be the culprit. This small component plays a big role in ensuring your heater operates safely. Understanding the signs of a faulty thermocouple can save you from chilly showers and costly repairs. Let’s dive into what you should look for.Uneven Temperature
If you’ve noticed that your shower fluctuates between hot and cold, the thermocouple might be failing. It’s supposed to help maintain a steady temperature by signaling the gas valve. When it malfunctions, this regulation falters. Think about your last unpredictable shower—did you have to constantly adjust the tap? That’s a red flag for thermocouple issues.Burner Won’t Stay Lit
A burner that refuses to stay lit is another common sign. The thermocouple’s job is to detect the flame and signal the gas valve to stay open. Without this signal, the valve shuts off, extinguishing the flame. Have you found yourself repeatedly relighting the burner, only to see it go out again? It’s frustrating but indicative of a possible thermocouple problem.Faulty Pilot Light
A pilot light that won’t ignite or stay lit can be traced back to a faulty thermocouple. The thermocouple ensures the pilot light remains burning by allowing the gas to flow. If it’s defective, the gas supply is cut off. Have you stood over your water heater, lighter in hand, wondering why it won’t catch? This scenario suggests a thermocouple replacement might be due.Rust And Corrosion
Physical signs like rust and corrosion on the thermocouple are telling. Moisture and age can lead to these issues, impacting its performance. Take a moment to inspect your thermocouple—does it look worse for wear? Visible damage should prompt you to consider replacing it.Unusual Noises
Strange noises emanating from your water heater can also signal thermocouple troubles. Clicking or hissing sounds may indicate the component is struggling to function. Have you heard unfamiliar sounds from your heater recently? This could be the thermocouple crying out for attention. Addressing a faulty thermocouple promptly can prevent larger issues down the line. What signs have you noticed that could point to this problem? Share your experiences and let’s troubleshoot together.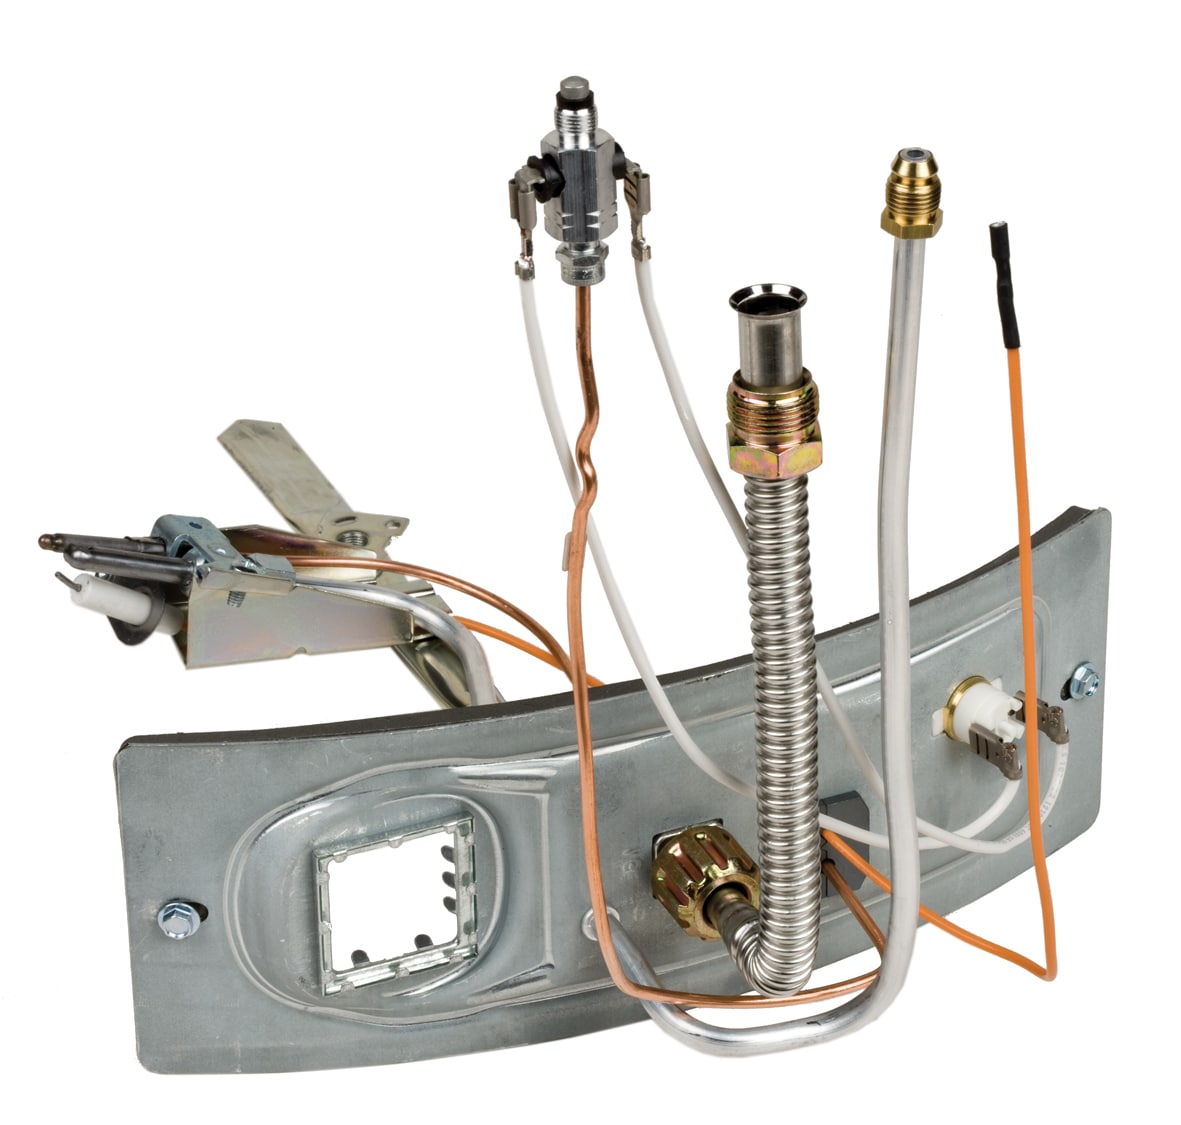
Credit: t-nax.com
Basic Thermocouple Function
Understanding the basic function of a thermocouple can save you time and money when troubleshooting your water heater. A thermocouple acts as a safety device, ensuring that your water heater’s pilot light is lit. If the pilot light goes out, the thermocouple shuts off the gas supply, preventing leaks and potential hazards. Simple, right?
But what happens when this little device stops working? Let’s dive into how a thermocouple functions and what you can do if you suspect an issue.
How Does A Thermocouple Work?
A thermocouple consists of two wires made from different metals. These wires are joined at one end. When heated by the pilot light, this junction produces a small electric current. This current travels back to the gas valve, keeping it open.
If the pilot light goes out, the thermocouple cools down, and the electric current stops. Without the current, the gas valve closes, ensuring safety. It’s a simple yet effective mechanism.
Signs Of A Faulty Thermocouple
Is your pilot light frequently going out? Or perhaps your water heater just won’t stay lit? These could be signs of a faulty thermocouple. Before assuming the worst, check if the thermocouple is dirty or misaligned.
You might notice soot or debris around the thermocouple. Cleaning it could solve your problem. Also, ensure the thermocouple tip is directly in the flame. A little adjustment might be all it takes.
Simple Troubleshooting Steps
- First, turn off the gas supply for safety. Always prioritize safety when working with gas appliances.
- Inspect the thermocouple for dirt or soot. Use a soft cloth or sandpaper to clean it.
- Check the alignment. The tip should be engulfed by the pilot flame. Adjust if necessary.
- If these steps don’t work, consider replacing the thermocouple. They’re inexpensive and easy to replace.
When To Call A Professional
If you’re still experiencing issues after cleaning and aligning, it might be time to call a professional. A faulty gas valve or other internal issues might be at play. Don’t risk a DIY fix when it comes to gas and safety.
Have you ever wondered how much a simple understanding of your water heater can empower you? By learning these basic functions, you can troubleshoot minor issues and decide when it’s time for expert help. How has this knowledge helped you in maintaining your home appliances?
Safety Precautions
Before troubleshooting your water heater thermocouple, focus on safety. Handling electrical and gas components can be risky. Taking proper precautions ensures safety and prevents accidents.
Ensure The Power Is Off
Turn off the power supply to the water heater. This prevents electrical shock. Use the circuit breaker to cut off power. Double-check to confirm the power is off.
Shut Off The Gas Supply
Close the gas valve to the water heater. This stops gas flow and minimizes fire risk. Check for any gas smell. If detected, leave the area immediately.
Ventilate The Area
Ensure good airflow in the working area. Open windows and doors for fresh air. This helps disperse any gas leaks or fumes. Ventilation keeps you safe.
Wear Protective Gear
Put on safety gloves and goggles. Protect your hands and eyes from debris. Consider wearing a mask if dust is present. Safety gear minimizes injury risk.
Keep A Fire Extinguisher Nearby
Have a fire extinguisher within reach. Use it in case of an emergency. Ensure it’s suitable for electrical and gas fires. A ready extinguisher increases safety.
Read The Manual
Consult the water heater’s manual. Follow specific safety instructions provided. Manuals contain valuable information for safe handling. Knowledge enhances safety.
Credit: www.familyhandyman.com
Tools Needed For Troubleshooting
Understanding the tools needed for troubleshooting a water heater thermocouple is crucial. These tools help ensure safety and efficiency during repairs. Having the right equipment can make the process smoother and less stressful. Let’s explore the essential tools you need.
Basic Safety Gear
Before starting, wear safety gloves and goggles. They protect against hot surfaces and flying debris. These items are essential for safe handling.
Multimeter
A multimeter checks electrical connections and voltage. It helps identify issues in the thermocouple. Ensure your multimeter is functional and calibrated.
Screwdriver Set
Different screwdrivers are needed to open the heater panel. Ensure you have both flathead and Phillips types. They help access the thermocouple area.
Wrench
A wrench is necessary to loosen nuts and bolts. It aids in removing the thermocouple. Keep a wrench handy for easy access.
Wire Cutter
Wire cutters trim damaged wires. They ensure clean, precise cuts. Sharp cutters are vital for proper wire handling.
Flashlight
A flashlight illuminates dark areas inside the heater. It helps you see connections clearly. Ensure your flashlight has fresh batteries.
Thermocouple Replacement Kit
This kit contains a new thermocouple and necessary fittings. It ensures you have all needed parts. Always keep a spare kit for emergencies.
Step-by-step Inspection Guide
Water heater issues can disrupt your daily routine. A malfunctioning thermocouple is a common problem. This guide offers clear steps to inspect your water heater thermocouple. Understanding these steps can help you identify and address the issue efficiently.
Checking The Pilot Light
The pilot light is crucial for your water heater’s operation. Begin by checking if it’s lit. A pilot light that won’t stay lit could indicate a thermocouple problem. Observe the flame. It should be blue and steady. A yellow or flickering flame may suggest issues with the gas supply or thermocouple.
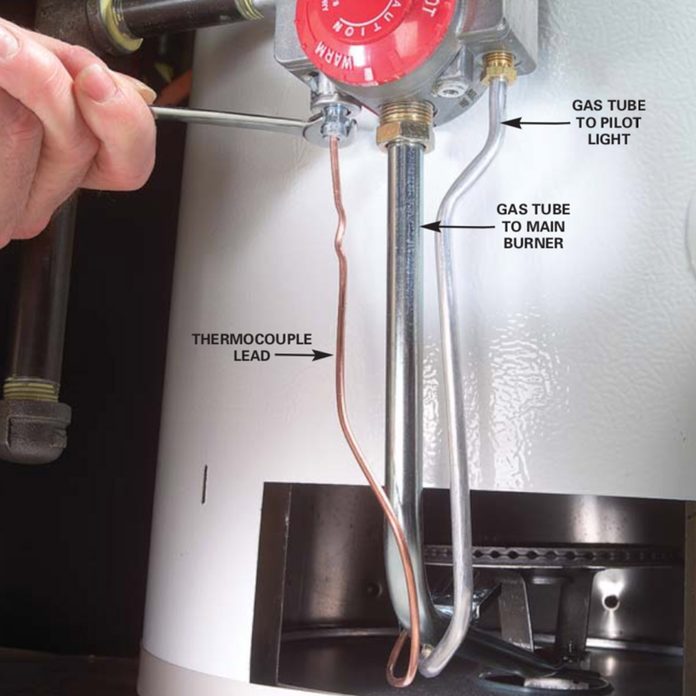
Inspecting The Thermocouple Connection
A loose thermocouple connection can cause the pilot light to go out. Check the thermocouple’s connection to the gas valve. Ensure it is secure. If the connection is loose, tighten it gently. Be careful not to damage the threads.
Assessing The Thermocouple Condition
The thermocouple should be in good condition. Look for any visible damage or corrosion. A worn-out thermocouple won’t function properly. If you see any damage, replacement is necessary. A clean, undamaged thermocouple is essential for a working water heater.
Cleaning And Maintenance Tips
Troubleshooting a water heater thermocouple starts with checking for loose connections. Ensure the thermocouple is clean and free of debris. Regular maintenance helps prevent common issues and extends the lifespan of your water heater.
Maintaining your water heater’s thermocouple can significantly extend the appliance’s lifespan and ensure efficient operation. Regular cleaning and maintenance can prevent unexpected breakdowns and costly repairs. You might even find the process satisfying, knowing you’re taking proactive steps to keep your home running smoothly. Here are some practical tips to guide you through the cleaning and maintenance of your water heater thermocouple.Inspecting The Thermocouple
Start by turning off the gas supply to your water heater. This ensures your safety while you work. Once off, remove the access panel to reach the thermocouple. Look for any signs of dirt or soot. A dirty thermocouple can prevent the pilot light from staying lit.Cleaning The Thermocouple
Use a fine sandpaper or steel wool to gently clean the thermocouple. This removes any buildup that might interfere with its function. Ensure you clean all sides thoroughly but avoid over-scrubbing. The goal is to restore its shiny appearance without damaging it.Reassembling The Components
After cleaning, carefully reattach the thermocouple to its bracket. Ensure it’s secured in place. Reconnect any other components you removed. Check that everything is tight but not overly tightened, which can cause damage.Testing The Water Heater
Once reassembled, turn the gas supply back on. Light the pilot and observe if it stays lit. If it doesn’t, double-check your work. Sometimes, a second cleaning might be necessary or a deeper issue might be present.Regular Maintenance Schedule
Consider setting a regular schedule for checking and cleaning your thermocouple. Every six months is a good starting point. This routine ensures you catch any issues early and keeps your water heater running efficiently. A little maintenance goes a long way in preventing bigger problems. Are you willing to spare a few minutes every few months to save on costly repairs? Taking these simple steps can make a big difference in your appliance’s performance.Replacing The Thermocouple
Replacing the thermocouple in your water heater can feel like stepping into unknown territory. You might wonder if you have the skills or tools for the job. But with the right guidance, it becomes a straightforward task that can save you from cold showers and costly repairs. This part of the troubleshooting process is crucial, as a faulty thermocouple can prevent your heater from igniting. Let’s break it down step-by-step.
Selecting A New Thermocouple
Choosing the right thermocouple is essential. Ensure that the length and type match your heater’s specifications. Check the packaging or consult your water heater’s manual for the correct type.
Consider the material. Most thermocouples are made of copper, but stainless steel options may offer enhanced durability. Think about the environment where your heater operates. Do you need something more robust?
Thermocouples are inexpensive, typically ranging from $5 to $20. It’s worth investing in a quality product for peace of mind. A reliable thermocouple ensures consistent performance over time.
Installation Process
Before you start, gather your tools: a wrench, screwdriver, and possibly pliers. Make sure the gas supply is off for safety. Have you ever attempted DIY repairs before? This will be similar.
Locate the thermocouple near the burner. Detach it using a wrench, turning counterclockwise. If it’s stuck, gently apply force. Remember the orientation for easy reinstallation.
Insert the new thermocouple, ensuring it’s positioned correctly. Tighten it securely but avoid over-tightening. Reconnect any wires if applicable. Now, test your work: turn on the gas and ignite the pilot. Does it stay lit?
Don’t rush the process. A thorough installation prevents future issues. Have you followed each step carefully? If everything checks out, you’ve successfully replaced your thermocouple.
Replacing the thermocouple might seem daunting, but with patience and attention to detail, you can master it. What other home repairs have you tackled successfully? This could be the next skill to add to your repertoire.
When To Call A Professional
A professional should be called when the water heater thermocouple shows signs of wear or malfunction. Unusual noises, inconsistent water temperatures, or pilot light issues indicate it’s time to seek expert help. Proper diagnosis ensures safety and efficiency.
When it comes to troubleshooting your water heater’s thermocouple, there are times when you can roll up your sleeves and get the job done yourself. However, there are also moments when calling a professional is the wisest choice. Understanding when to seek expert help not only saves you time and stress but also ensures the safety of your home. Before deciding to call in the pros, it’s crucial to recognize the signs of a faulty thermocouple. Is the pilot light repeatedly going out, even after you’ve relit it? This might indicate a thermocouple issue. Another red flag is if your water heater isn’t producing any hot water. This could mean that the thermocouple is not effectively signaling the gas valve to stay open.Safety Concerns
Any work involving gas lines or electrical components comes with inherent risks. If you’re unsure about handling these safely, it’s best to step back and contact a professional. They have the expertise and tools to manage the job without endangering your home or family. Consider a story from a friend of mine who thought she could fix her own thermocouple. She overlooked some safety protocols and ended up damaging the gas valve, leading to a costly repair.Lack Of Necessary Tools
Do you have the right tools? A multimeter, for instance, is necessary to test the thermocouple’s voltage. Without it, you might misdiagnose the problem or cause further damage.Time And Convenience
Think about how much your time is worth. If troubleshooting and repairing your water heater is taking too long or interfering with your schedule, a professional can quickly resolve the issue.Potential For Further Damage
Attempting repairs without adequate knowledge can sometimes lead to bigger problems. Are you willing to take that risk? In some cases, what seems like a simple thermocouple replacement might reveal deeper issues with your water heater. A professional can spot these complexities and offer comprehensive solutions.Warranty Considerations
Check your water heater’s warranty. Many warranties require repairs to be performed by licensed technicians. Doing it yourself might void the warranty and lead to more expenses down the line. By recognizing these scenarios, you can make informed decisions about when to tackle the problem yourself and when to call in the experts. Your peace of mind and safety are worth it.Preventative Measures
Regular maintenance keeps water heater thermocouples in top shape. Check connections and clean debris for smooth performance. Spotting issues early prevents costly repairs and ensures a steady hot water supply.
Preventative Measures for maintaining your water heater thermocouple can save you from unexpected cold showers and costly repairs. If you’ve ever been startled by icy water when expecting warmth, you understand the importance of keeping your thermocouple in top shape. By taking a few simple steps, you can ensure your water heater functions efficiently and reliably.Regular Cleaning
Dust and debris can accumulate on your thermocouple over time. This buildup can interfere with its function, causing your pilot light to go out unexpectedly. Use a soft brush or compressed air to gently clean the thermocouple every few months. This small task can prevent bigger issues down the road. Have you ever skipped cleaning and faced a chilly surprise? It’s an easy fix that can save you discomfort.Inspect Connections
Loose connections can lead to malfunctioning of the thermocouple. Check the connections periodically to ensure they are secure. A simple tightening might be all it takes to prevent your heater from failing. Imagine discovering a loose wire was the cause of your cold shower. A quick inspection can provide peace of mind.Monitor Pilot Light
A flickering or weak pilot light could indicate a thermocouple problem. Keep an eye on the flame. It should be blue and steady. If it’s not, your thermocouple might need attention. Have you noticed any changes in the flame recently? A consistent check can avert larger issues.Replace When Necessary
Thermocouples have a lifespan. If yours is older, consider replacement before it fails. It’s better to replace proactively than reactively. Do you know when your thermocouple was last replaced? If it’s been years, it might be time to invest in a new one.Seek Professional Help
Sometimes, DIY measures aren’t enough. If you’re unsure about the condition of your thermocouple or if problems persist, consult a professional. It’s worth the investment to ensure your water heater runs smoothly. Have you ever tried fixing something yourself only to make it worse? A professional can provide expertise and prevent further damage. By integrating these preventative measures, you can enjoy hot showers without interruption. Regular maintenance not only extends the life of your thermocouple but also saves money on repairs. What steps will you take today to ensure your water heater is reliable?Faqs On Thermocouple Issues
Thermocouples are crucial for water heater safety. They sense the pilot light’s heat. Many users face issues with thermocouples. This section addresses common questions. Understanding these can help you troubleshoot effectively.
Why Is My Water Heater Pilot Light Not Staying Lit?
The thermocouple might be faulty. It may not detect the pilot flame. Dirt or debris can also block it. Ensure the thermocouple is clean and positioned correctly.
How Can I Test A Thermocouple?
Use a multimeter to check the thermocouple’s voltage. Disconnect it from the gas valve first. A healthy thermocouple should read between 25 and 30 millivolts.
What Causes A Thermocouple To Fail?
Wear and tear is common. Exposure to moisture or corrosion can damage it. Regular maintenance can prevent these issues.
Can I Replace The Thermocouple Myself?
Yes, you can. Turn off the gas and disconnect the old thermocouple. Install a new one of the same type and size. Follow the manufacturer’s instructions for safe installation.
How Often Should I Check My Thermocouple?
Inspect it annually for wear and damage. Regular checks ensure it functions correctly. This can prevent unexpected heater shutdowns.
What If The New Thermocouple Doesn’t Work?
Ensure it is installed correctly. Check the connections and the gas valve. If problems persist, consult a professional for further diagnosis.
Conclusion
Troubleshooting a water heater thermocouple can be simple. Start with basic checks. Ensure the pilot light stays lit. Test the thermocouple with a multimeter. Replace it if faulty. Regular maintenance helps prevent issues. Clean and inspect parts regularly. This keeps your heater running smoothly.
Always follow safety precautions. If problems persist, seek professional help. A working thermocouple is key for efficient heating. Remember, safety first. Regular checks save time and money. Keep your water heater in top condition. Your efforts ensure consistent hot water.
Enjoy reliable heating all year round.