
Have you ever found yourself in a cold shower, shivering and wondering why your water heater isn’t doing its job? Chances are, the issue might be related to a low thermopile voltage.
This might sound technical, but it’s a common problem that can disrupt your daily routine. Imagine waking up one chilly morning, looking forward to a warm, soothing shower, only to be met with icy cold water. Frustrating, right? Understanding what “water heater thermopile voltage low” means could be your key to a quicker fix and returning to the comfort of hot water.
We’ll break down everything you need to know in simple terms, so you can tackle the issue head-on and get back to enjoying those warm showers you love. Keep reading to find out how you can identify and resolve this problem, ensuring your water heater performs optimally.
Credit: www.h2ouse.org
Page Contents
Causes Of Low Thermopile Voltage
Low thermopile voltage in a water heater can disrupt its function. Understanding the causes helps in troubleshooting. Several factors can affect the thermopile’s performance. Below, we discuss common causes of low voltage.
Dirt And Debris Buildup
Dirt and debris can block the thermopile’s surface. This buildup affects heat transfer. Reduced heat transfer lowers the voltage output. Regular cleaning prevents this issue. Ensure the thermopile area stays clear.
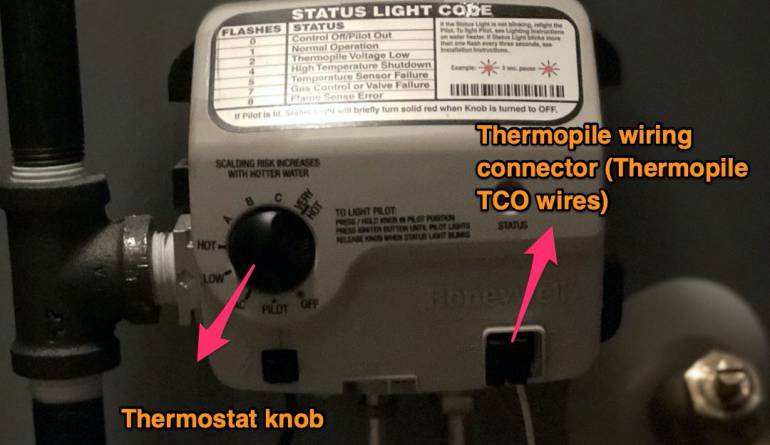
Loose Connections
Loose connections can cause voltage drops. Check all wires and terminals. Make sure they are tight and secure. Loose parts can disrupt the electric flow. A secure connection ensures stable voltage.
Thermopile Age And Wear
Thermopiles can wear out over time. Age affects their efficiency. Older thermopiles may produce lower voltage. Regular inspection helps assess their condition. Replace worn thermopiles for optimal function.
Symptoms Of Low Thermopile Voltage
Experiencing inconsistent hot water can signal low thermopile voltage in your water heater. Other signs include a pilot light that won’t stay lit and the water heater frequently shutting off.
When the voltage of your water heater’s thermopile is low, it can lead to several noticeable symptoms. These symptoms can disrupt your daily routine, making it essential to recognize them early. Understanding these signs can help you take timely action and ensure your water heater functions efficiently.Pilot Light Problems
A common symptom of low thermopile voltage is issues with the pilot light. You might find that the pilot light flickers or goes out frequently. This is a clear indicator that the thermopile isn’t generating enough power to keep the pilot light steady. Imagine waking up on a chilly morning, only to find that your water heater’s pilot light has gone out again—frustrating, right? Consistent pilot light issues can be a signal to check the thermopile voltage.Fluctuating Water Temperature
Another symptom is fluctuating water temperature. You may notice that your shower alternates between hot and cold, even though you haven’t adjusted the dial. This inconsistency can be a result of insufficient thermopile voltage affecting the water heater’s ability to maintain a stable temperature. Have you ever started your day with a hot shower, only for it to turn ice-cold unexpectedly? Such moments can be jarring, hinting at potential thermopile issues.Unusual Sounds
Low thermopile voltage can also cause unusual sounds from your water heater. You might hear clicking or popping noises, indicating that the heater is struggling to operate efficiently. These sounds are not just an inconvenience; they can be a warning sign of underlying issues. Picture yourself sitting in silence, only to be interrupted by strange noises from your water heater. These sounds can be a call to check your thermopile voltage. Recognizing these symptoms early can save you from the hassle of a malfunctioning water heater. Have you experienced any of these signs with your water heater? Addressing them promptly can prevent further complications and ensure your home remains comfortable.Safety Precautions
Dealing with water heater issues, like low thermopile voltage, is not just about fixing the problem but ensuring safety. Your safety is paramount, especially when handling appliances that involve gas and electricity. Before you dive into troubleshooting, consider these safety precautions to protect yourself and those around you.
Turn Off The Heater
First things first—turn off your water heater. It’s a simple yet vital step. You don’t want to risk electrocution or gas leaks while working on it. Locate the power switch and gas valve, and switch them off. Many people overlook this step, but it can be a lifesaver. Have you ever attempted a repair without doing this? The potential hazards are not worth it.
Ensure Proper Ventilation
Working in a well-ventilated area is crucial. Gas heaters can emit dangerous fumes, and you need fresh air to avoid inhaling them. Open windows and doors to let air circulate freely. If you’re in a basement or cramped space, you might need a fan to improve airflow. This small action can make a huge difference in maintaining a safe environment.
Use Protective Gear
Wearing the right protective gear can shield you from harm. Gloves, goggles, and sturdy footwear are essential. You might think these are overkill, but they can protect you from burns, cuts, and other injuries. Imagine getting splashed with hot water or coming into contact with sharp edges—gear can prevent painful accidents.
Safety isn’t just a checklist; it’s about maintaining a mindset where precaution becomes second nature. Next time you face a water heater issue, will you remember these steps? The peace of mind is worth every effort.
Cleaning The Thermopile
Is your water heater showing a low thermopile voltage warning? Cleaning the thermopile can often solve this issue. Dust and grime can accumulate on the thermopile over time. This buildup reduces the efficiency of your water heater. Regular cleaning keeps it working at its best. It also extends the lifespan of your unit.
Tools Needed
- Soft brush
- Microfiber cloth
- Compressed air canister
- Safety gloves
- Screwdriver
Step-by-step Cleaning Guide
- Turn off the water heater. Let it cool down completely.
- Wear safety gloves to protect your hands.
- Use a screwdriver to open the access panel.
- Locate the thermopile near the burner.
- Gently brush away dust with a soft brush.
- Use a microfiber cloth to wipe the thermopile.
- Blow away remaining debris with compressed air.
- Reattach the access panel securely.
- Turn the water heater back on.
Frequency Of Cleaning
Clean the thermopile every six months. This ensures optimal performance. If your area is dusty, clean more frequently. Regular cleaning prevents malfunctions. It also helps in maintaining efficiency. Keeping your water heater clean saves energy and money.
Checking And Tightening Connections
Experiencing low voltage issues with your water heater thermopile? Checking and tightening connections is crucial. Loose or corroded connections can reduce performance. This simple process can enhance your water heater’s efficiency. Let’s explore the steps involved.
Identifying Loose Wires
Begin by turning off the water heater. Safety first! Carefully inspect all wires. Look for signs of wear or looseness. Gently tug each wire to check for stability. Any movement signals a loose connection. These need immediate attention.
Tightening Techniques
Once you’ve found loose wires, grab a screwdriver. Use it to tighten loose screws or terminals. Ensure each wire is snugly fitted. Avoid overtightening; it can damage the connection. A firm hold ensures stability without causing harm.
Testing Connection Stability
After tightening, test the connection stability. Turn the water heater back on. Observe the performance. Is the voltage steady? Use a multimeter for precise readings. If the problem persists, consider professional help.
Replacing A Faulty Thermopile
Experiencing low voltage in your water heater thermopile? Replacing the faulty thermopile can restore efficient heating. Ensure proper installation to maintain optimal performance and safety.
Replacing a faulty thermopile in your water heater can seem daunting, but it’s a necessary task to restore functionality and efficiency. A thermopile, essentially a collection of thermocouples, generates the voltage needed to ignite the gas burner. When it starts to fail, it can lead to a frustrating lack of hot water. Understanding the signs of wear and tear, choosing the right replacement, and knowing the installation process can make this task straightforward and rewarding. Let’s dive into the steps to get your water heater back on track.Signs Of Wear And Tear
Recognizing the signs of a failing thermopile early can save you from unexpected cold showers. One common indicator is an inconsistent pilot light. If it flickers or goes out frequently, your thermopile may not be generating enough voltage. Another sign is a drop in water temperature. If you notice your water heater is struggling to reach its usual temperature, it might be time to inspect the thermopile. Additionally, a multimeter reading below 750 millivolts typically signals a replacement is necessary.Choosing The Right Replacement
Not all thermopiles are created equal. Selecting the right one depends on your specific water heater model. Check your manual or the manufacturer’s website for the correct part number. You can also consult with a professional if you’re unsure. It’s important to buy from a reputable supplier to ensure quality and compatibility. Investing in a good replacement will pay off in reliability and longevity.Installation Process
Once you have the right thermopile, it’s time to replace the faulty one. Begin by turning off the gas supply to ensure safety. Next, remove the access cover and locate the thermopile. Carefully disconnect it from the gas control valve. Install the new thermopile by connecting it to the valve and securing it in place. Ensure all connections are tight and nothing is loose. Finally, turn the gas supply back on and test the pilot light. It should now stay lit, indicating the new thermopile is functioning correctly. Have you ever tried replacing a thermopile yourself? What challenges did you face, and how did you overcome them? Share your experiences in the comments, and help others tackle their water heater woes!Regular Maintenance Tips
Regular maintenance of your water heater is crucial. It ensures efficient operation and extends its lifespan. A key part of this is checking the thermopile voltage. Low voltage can cause poor heater performance. Follow these maintenance tips to keep your heater in top condition.
Scheduling Routine Inspections
Set a regular schedule for inspections. Consistent checks help identify issues early. Monthly or quarterly inspections are ideal. During inspections, look for signs of wear and tear. Inspecting the thermopile ensures it functions well. It also prevents unexpected breakdowns.
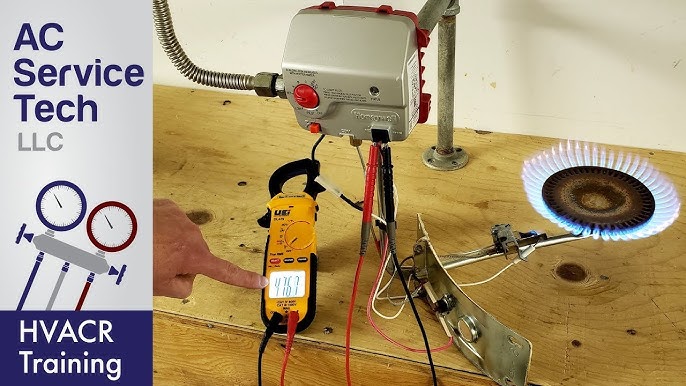
Monitoring Voltage Levels
Regularly check the voltage levels of the thermopile. Use a multimeter to measure the voltage. The reading should be within the manufacturer’s recommended range. Low voltage indicates a potential issue. Address it promptly to avoid further problems.
Professional Service Recommendations
Hire a professional for thorough inspections. A qualified technician can spot hidden issues. They have the expertise to fix complex problems. Professional service ensures your water heater operates safely. Schedule a service visit at least once a year.
Credit: www.youtube.com

Credit: www.pinterest.com
Frequently Asked Questions
How Do You Fix A Low Thermopile Voltage?
Check for loose connections and clean the thermopile. Adjust or replace faulty components to boost voltage. Ensure the pilot flame is strong and properly positioned. Regular maintenance helps prevent future issues and maintain optimal thermopile performance.
How Do I Know If My Water Heater Thermopile Is Bad?
Check for a weak or flickering pilot light. A faulty thermopile prevents the pilot from staying lit.
What Happens When A Thermopile Goes Bad?
A faulty thermopile can prevent your gas appliance from igniting. It fails to generate necessary voltage, stopping the gas valve from opening. This results in the appliance not producing heat. Regular maintenance and timely replacement ensure efficient operation.
Can I Replace A Thermopile Myself?
Replacing a thermopile is possible for DIY enthusiasts. Ensure you have the right tools and safety precautions. Follow manufacturer instructions carefully. If unsure, consult a professional for assistance. Proper installation ensures efficient operation.
Conclusion
A low thermopile voltage in your water heater can cause issues. Addressing it ensures efficient hot water. Regular maintenance helps prevent problems. Check connections and clean the pilot light area. Replace faulty components promptly. A professional inspection might be necessary for persistent issues.
This keeps your water heater running smoothly. Warm showers and baths await you. Remember, timely action saves money. Keep your water heater in top shape. Stay proactive and enjoy reliable comfort.