
Is your water heater not functioning as efficiently as it should? It might be time to consider installing a new thermostat.
A properly functioning thermostat is essential for maintaining the right water temperature, ensuring energy efficiency, and keeping your utility bills in check. Imagine waking up to a perfectly warm shower every morning without the worry of fluctuating water temperatures or unexpected cold bursts.
By understanding the basics of water heater thermostat installation, you can take control of your home’s comfort and energy use. Dive into this guide to discover how you can easily and effectively upgrade your water heater’s thermostat, making your daily routines smoother and more enjoyable.

Credit: www.whirlpoolwaterheaters.com
Page Contents
- 1 Tools And Materials Needed
- 2 Safety Precautions
- 3 Turning Off Power Supply
- 4 Removing The Access Panel
- 5 Locating The Thermostat
- 6 Disconnecting Wires
- 7 Removing The Old Thermostat
- 8 Installing The New Thermostat
- 9 Reconnecting Wires
- 10 Securing The Access Panel
- 11 Restoring Power Supply
- 12 Testing The New Thermostat
- 13 Conclusion
Tools And Materials Needed
Installing a water heater thermostat can be a rewarding project, especially when you want to ensure your water heater operates efficiently. Before diving into the installation process, it’s essential to gather the right tools and materials. Having everything at hand saves time and prevents those frustrating moments of realizing you’re missing something crucial. So, let’s take a closer look at what you’ll need.
Tools You’ll Need
Imagine reaching for a tool only to realize it’s not in your kit. Frustrating, right? Here’s a handy list to avoid such scenarios:
- Screwdriver Set:A set with various sizes is essential for removing and securing screws.
- Multimeter:This tool checks for electrical continuity, ensuring the thermostat is receiving power.
- Wire Strippers:Perfect for prepping wires for connection. They help you avoid damaging the wire insulation.
- Voltage Tester:Confirm that power is off before you start working. Safety first!
- Adjustable Wrench:Useful for loosening and tightening nuts and bolts.
Have you ever tried using the wrong screwdriver size? It’s a struggle! A complete set saves you from such hassles.
Materials You’ll Need
Gathering the correct materials ensures a smooth installation process. Here’s what you’ll need:
- Replacement Thermostat:Ensure it’s compatible with your water heater model.
- Electrical Tape:It’s ideal for insulating wire connections and securing loose wires.
- Wire Connectors:These are necessary to safely connect wires without risk of short circuits.
- Protective Gloves:Keep your hands safe while handling wires and sharp tools.
- Instruction Manual:Refer to it for specific installation steps tailored to your thermostat model.
Ever wondered why electrical tape is essential? It’s not just for insulation but also prevents potential hazards from exposed wires.
Before you start, have you thought about safety? Here are some precautions to keep in mind:
- Always turn off the power at the circuit breaker before starting.
- Double-check with a voltage tester to confirm there’s no electricity flowing.
- Wear protective gloves to prevent electrical shocks and injuries.
How often have you heard stories about DIY projects gone wrong due to overlooked safety measures? Don’t let that be your story.
In gathering these tools and materials, you’re not just preparing for a successful installation; you’re ensuring your safety and peace of mind. Ready to take on the challenge? Your toolkit is your best friend in this journey!
Safety Precautions
Install water heater thermostats with caution by turning off power first. Ensure all connections are secure and follow instructions closely. Use insulated tools to prevent electric shocks.
Ensuring safety during water heater thermostat installation is crucial. Mistakes can lead to hazards. Following safety guidelines protects your home and loved ones. Proper precautions ensure a smooth installation process. This section outlines essential safety steps for thermostat installation.Turn Off The Power
Always turn off the power to the water heater. Use the circuit breaker. Double-check with a voltage tester. Make sure there’s no electrical current. This step prevents electric shocks.Use Appropriate Tools
Gather all necessary tools before starting. Use insulated tools for safety. Proper tools make the job easier. They also reduce the risk of injury.Wear Protective Gear
Wear gloves and safety goggles. Protect your hands and eyes. Working with electrical components can be dangerous. Safety gear minimizes risks.Ensure Proper Ventilation
Work in a well-ventilated area. Avoid inhaling dust or fumes. Ventilation reduces health risks. It keeps the workspace safe and comfortable.Follow Manufacturer Instructions
Read the water heater’s manual carefully. Follow all instructions. Each model may have specific requirements. Adhering to guidelines ensures proper installation.Turning Off Power Supply
Ensure safety first by turning off the power supply before installing a water heater thermostat. Locate the circuit breaker and switch it off to prevent electric shock. This simple precaution safeguards you during the installation process.
Before you start installing a water heater thermostat, it’s crucial to ensure safety by turning off the power supply. This step is not just a formality but a vital safety measure that can prevent accidents. Imagine the shock of working with live wires; it’s not just unpleasant but downright dangerous. Taking this step seriously can save you from both minor injuries and serious electrical hazards. So, how do you do it effectively? Let’s delve into the process.Identifying The Circuit Breaker
Begin by locating your home’s electrical panel. Typically, you’ll find it in a garage, basement, or utility room. Your water heater should have a dedicated circuit breaker. Look for a breaker labeled “Water Heater” or something similar. If it’s not labeled, you might need to test a few until you find the right one. Always use caution when handling electrical panels.Switching Off The Correct Breaker
Once you’ve identified the correct breaker, switch it off. You should hear a firm click indicating it’s off. Take a moment to test the breaker with a voltage tester to ensure the power is truly off. This tool is inexpensive and invaluable for ensuring your safety.Double-checking Power Off
Before proceeding, it’s wise to double-check that the power is indeed off. Go to the water heater and use a non-contact voltage tester on the wires. If the tester lights up or beeps, the power is still on. Don’t proceed until you resolve this. Always prioritize your safety over speed.Labeling The Breaker
While you’re at the panel, label the breaker if it’s not already marked. This will save you time and confusion in future maintenance tasks. Think about how much easier it will be for anyone else who might need to work on the heater. It’s a small task that has big benefits down the road.Communicating With Household Members
Inform everyone in your household that the power to the water heater is off. This is especially important if others might be using hot water during your installation. A quick heads-up can prevent someone from unknowingly switching the breaker back on. Communication is key to maintaining safety during home projects. Turning off the power supply might seem like a basic step, but its importance cannot be overstated. Have you ever experienced the shock of working with live electricity? Taking these precautions ensures that your installation process is both safe and efficient.Removing The Access Panel
Removing the access panel is an essential step in water heater thermostat installation. This part of the process allows you to reach the internal components. It’s crucial for replacing or adjusting the thermostat. Follow the instructions carefully to avoid damaging the heater.
Removing The Screws
The access panel is usually held by screws. Use a screwdriver to remove them. Keep the screws in a safe place. You will need them later for reassembly. Make sure the screwdriver fits the screws correctly. This prevents stripping the screw heads. Turn each screw counterclockwise to loosen.
Accessing The Panel
Once the screws are out, gently pull the panel away. Be cautious while doing this. It might need a slight wiggle to come off. Don’t force it as you might damage the panel. Check for any wires connected to the panel. If present, disconnect them carefully.
Inspecting Inside
With the panel removed, inspect the inside of the heater. Look for any signs of wear or damage. Ensure there are no loose wires or debris. This inspection helps in understanding the thermostat’s condition. If the area is dusty, clean it with a cloth. This ensures better visibility and maintenance.
Locating The Thermostat
Finding the thermostat in your water heater is a crucial step. It ensures efficient heating and safety. Many people find this task confusing. But with the right guidance, it becomes straightforward. Let’s explore how to locate the thermostat in your water heater.
Understanding Your Water Heater
Before searching for the thermostat, identify your water heater type. There are two main types: electric and gas. Each has a different thermostat location. Knowing your type helps in locating it faster.
Locating The Thermostat In Electric Water Heaters
Electric water heaters often have two thermostats. One is at the top, and the other at the bottom. They are usually behind metal panels. Unscrew these panels carefully. Always ensure the power is off before starting. Safety first!
Locating The Thermostat In Gas Water Heaters
Gas water heaters have a single thermostat. It is usually near the base. Look for a control knob or dial. This is often the thermostat. It might be part of a larger control unit. Be gentle when handling these parts.
Tools You Might Need
A screwdriver is essential for electric heaters. For gas heaters, you often need a wrench. Always have a flashlight handy. It helps in dark areas and ensures precision.
Always turn off power for electric heaters. For gas heaters, turn off the gas supply. Wear protective gloves. This prevents accidental cuts or burns. Safety should always be your top priority.
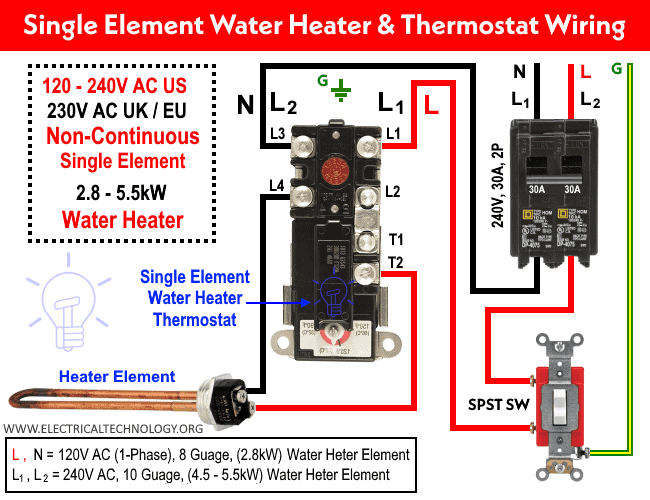
Credit: www.electricaltechnology.org
Disconnecting Wires
Disconnecting wires is a crucial step in water heater thermostat installation. Ensure safety by turning off the power. Label each wire to avoid confusion during reconnection.
When tackling a water heater thermostat installation, disconnecting wires is a crucial step. It’s where precision meets patience. Before you dive in, ensure your safety gear is on and the power is off. Disconnecting wires isn’t just about pulling cables; it’s about knowing which ones to pull and how to do it safely. Let’s break it down.Understanding Your Water Heater’s Wiring
Begin by familiarizing yourself with your water heater’s wiring diagram. This small map is often found on the inside of the access panel. It helps you identify which wires are connected to the thermostat and heating elements. Knowing this can prevent mistakes and save you time. Have you ever tried assembling furniture without instructions? This is similar, but with electricity involved.Tools You’ll Need
Prepare the right tools for the job. A screwdriver, voltage tester, and needle-nose pliers are must-haves. The screwdriver helps you remove the access panel. The voltage tester ensures the power is truly off. The needle-nose pliers are perfect for handling wires in tight spaces. These tools make the task manageable and safe.Safety First: Confirm Power Is Off
Always double-check that the power is off using a voltage tester. Even if you’ve already flipped the breaker, it’s wise to test again. Electricity is invisible but powerful. One quick test can prevent accidents. Wouldn’t you rather be safe than sorry?Disconnecting The Wires
Carefully detach the wires from the thermostat and heating elements. Use your needle-nose pliers for precision. Label each wire with tape, noting where it came from. This step is crucial for reassembly. Have you ever tried to remember what wire went where without a label? It can turn into a frustrating puzzle.Keeping Track Of Components
Keep a small tray or box nearby for screws and small parts. This prevents them from rolling away and getting lost. Organization at this stage pays off later. Losing parts can lead to unnecessary trips to the hardware store, costing you time and money.Revisiting Your Wiring Diagram
Once wires are disconnected, revisit your wiring diagram. Ensure that everything matches what you’ve labeled. It’s your roadmap for successful reinstallation. Double-checking at this stage saves you from headaches later. Isn’t it satisfying to know you’ve done it right the first time? Disconnecting wires during a water heater thermostat installation isn’t just about unplugging; it’s a methodical process that requires attention and care. By following these steps, you ensure a safe and efficient installation. What insights have you discovered during your own home repair adventures?Removing The Old Thermostat
Removing the old thermostat from your water heater might seem daunting, but it’s a straightforward task with the right approach. Whether you’re updating your system for better efficiency or replacing a faulty unit, carefully removing the old thermostat is essential. Are you ready to get your hands dirty and learn some practical tips?
Gather Your Tools
Before you start, make sure you have the necessary tools. A screwdriver, a voltage tester, and safety gloves are essential. This ensures you don’t get caught halfway through the process, scrambling for a missing tool.
Safety First: Turn Off Power
Your safety is paramount. Turn off the power supply to the water heater at the circuit breaker. Use a voltage tester to double-check that there’s no electricity flowing to the unit. Have you ever felt that adrenaline rush when working with electricity? It’s better to be cautious.
Access The Thermostat
Locate the access panel on your water heater. Remove the screws holding the panel in place. Carefully lift the panel to expose the thermostat. Do you feel a sense of accomplishment as you unveil the inner workings?
Disconnect Wiring
Examine the wiring connected to the thermostat. Take a photo to remember the configuration for later. Carefully disconnect each wire using a screwdriver. Have you ever tried solving a puzzle? This part might remind you of that.
Remove The Old Thermostat
With the wiring disconnected, gently unscrew the old thermostat from its mount. Lift it away from the unit. Imagine you’re removing a piece of history from your water heater. Is there a sense of relief as you complete this step?
By removing the old thermostat, you’re paving the way for a new, efficient system. How does it feel to take control of your home maintenance tasks? Share your thoughts and any tips you’ve discovered along the way!

Credit: in.pinterest.com
Installing The New Thermostat
Installing a new thermostat in your water heater can enhance its performance. It ensures your water is heated efficiently and can help reduce energy costs. This guide will walk you through the installation process. Follow each step carefully for a smooth and successful installation.
Preparing The Work Area
Before starting, ensure your work area is safe. Turn off the power supply to the water heater. This prevents electric shock. Gather all necessary tools like a screwdriver and multimeter. Having everything ready makes the process easier.
Locate the thermostat cover on your water heater. Remove it using a screwdriver. Disconnect the wires carefully. Note their positions for the new thermostat. Take out the old thermostat gently. Keep it aside for reference.
Take the new thermostat and position it in place. Ensure it fits securely. Reconnect the wires according to your earlier notes. Tighten them firmly but not too tight. This ensures a stable connection.
Testing The Installation
After installing, replace the thermostat cover. Turn the power back on. Set the thermostat to your desired temperature. Use a multimeter to check if it’s working correctly. This confirms a successful installation.
Reconnecting Wires
Reconnecting wires during water heater thermostat installation ensures proper function and safety. Identify correct wiring connections carefully. Follow manufacturer’s instructions closely for optimal performance and efficiency.
Reconnecting wires during a water heater thermostat installation might sound daunting, but it’s a straightforward task if you follow a few key steps. It’s like piecing together a puzzle; once you know where each piece belongs, everything falls into place. Remember, safety is your top priority, so ensure the power is off before you begin.Understanding The Wiring Layout
Before diving into reconnecting, take a moment to familiarize yourself with the wiring layout. Different water heaters may have varied configurations, but generally, you will find color-coded wires. These colors help you identify which wire connects to which terminal. Have you ever reconnected wires without checking the layout first? It’s like trying to read a map upside down. Always double-check to ensure everything matches up correctly.Connecting Ground Wires
Ground wires are crucial for safety. They prevent electrical shocks by directing excess electricity to the ground. Typically, these wires are either green or bare copper. Make sure they are securely connected to the green screw or grounding terminal. This step is non-negotiable; it’s your safety net.Attaching The Thermostat Wires
Once the ground wires are in place, shift your attention to the thermostat wires. These are usually red or black. Ensure they are snugly attached to the appropriate terminals. Tight connections are vital to prevent any electrical arcing, which could lead to a malfunction. When was the last time you double-checked these connections?Using Wire Nuts For Safety
Wire nuts are your best friends here. After connecting wires, twist a wire nut securely over each connection. This not only protects the wires but also ensures they stay connected over time. Loose wires are a common cause of appliance failure. A simple twist of a wire nut can make all the difference in your installation’s longevity.Testing The Connections
After all wires are connected, it’s essential to test everything. Turn the power back on and check if the heater functions properly. If something seems off, recheck your connections. It’s better to spend a few extra minutes now than to deal with a malfunction later. Do you often skip this step due to excitement? Resist that urge for the sake of safety and efficiency. Reconnecting wires isn’t just about matching colors; it’s about ensuring a reliable and safe operation of your water heater. With these practical insights and a bit of patience, you’ll have your thermostat up and running in no time.Securing The Access Panel
Ensure the access panel is secure during water heater thermostat installation. Fasten screws tightly to prevent accidental opening. Safety is a priority, so double-check panel stability.
Securing the access panel during a water heater thermostat installation is crucial for both safety and efficiency. This step ensures that all electrical components are shielded, reducing the risk of accidents or malfunctions. Yet, many overlook this task, thinking it’s just about closing a door. But securing the panel properly can make a difference in the longevity and performance of your water heater.Understanding The Importance Of The Access Panel
The access panel is more than just a cover; it’s a protective shield. It keeps dust and moisture away from sensitive components. If you leave it unsecured, you risk damaging the thermostat and wiring.Gathering Your Tools
Before you begin, make sure you have the right tools. A screwdriver is essential. Check the screws on your panel to determine the type needed—Phillips or flathead.Aligning The Panel Properly
Position the panel so that it aligns with the mounting holes. This might seem trivial, but an improperly aligned panel can strain the screws. Ensure that all sides are flush with the heater.Tightening The Screws
Once aligned, begin tightening the screws. Use a firm grip but don’t over-tighten. Over-tightening can strip the screws or damage the panel, leading to loose fittings.Double-checking Your Work
After securing the panel, give it a gentle tug. It should not wobble or move. This simple check can save you from future headaches.Personal Tip: A Quick Safety Check
I once skipped this step, thinking it unnecessary. A week later, I found moisture inside, damaging the thermostat. Always double-check for a secure fit to avoid costly repairs. Is your access panel secure? If not, you might be inviting trouble. Taking a few extra minutes to ensure a snug fit can save you time and money in the long run. So next time, don’t just slap it on—make sure it’s on right!Restoring Power Supply
Restoring the power supply is a crucial step in thermostat installation. It’s important to ensure everything is connected properly before turning on the power. This step can be tricky, so proceed with care.
Once the thermostat is in place, it’s time to restore power. This step requires attention to detail for safety and functionality. Follow the steps below to ensure a smooth process.
Turning On The Circuit Breaker
Locate your home’s circuit breaker panel. Find the switch that controls your water heater. Flip the switch to the “on” position. This restores power to your water heater. Ensure the switch stays firmly in place.
Checking For Power
After turning on the circuit breaker, check the thermostat display. The display should light up, indicating power is restored. If the display remains off, double-check the connections. Ensure all wires are secure and properly connected.
Testing The Thermostat
Set the thermostat to your desired temperature. Wait for the water heater to reach the set temperature. Listen for any unusual sounds. These may indicate a problem that needs addressing. Verify the temperature with a thermometer.
Monitoring For Safety
Watch for signs of overheating or electrical issues. Check the thermostat regularly to ensure it’s functioning properly. If issues arise, disconnect power and inspect the installation. Safety is the top priority in this process.
Testing The New Thermostat
Once you have installed your water heater thermostat, it’s time to test it. Testing ensures your thermostat operates correctly, providing you with consistent hot water. This step is crucial to avoid future issues and ensure safety.
Check The Power Supply
First, make sure the power supply is active. Flip the circuit breaker to “on” for the water heater. Use a voltage tester to confirm the presence of power. This ensures the thermostat has electricity to function.
Set The Thermostat Temperature
Adjust the thermostat to your desired temperature setting. Most water heaters work efficiently at 120°F. This setting provides hot water without risk of burns or high energy bills.
Observe Water Heating Time
Turn on a hot water faucet and observe how quickly water heats up. The water should reach the set temperature within a reasonable time. Slow heating could indicate thermostat issues or other problems.
Check For Consistent Water Temperature
Let the water run for a few minutes. Ensure the temperature remains steady. Fluctuations may suggest a malfunctioning thermostat. Consistent temperature confirms the thermostat works well.
Listen For Unusual Noises
As the water heats, listen for unusual sounds. Strange noises might signal thermostat or heater issues. Typically, a quiet operation indicates everything functions properly.
Inspect For Leaks
While testing, check for any leaks around the heater. Leaks can lead to water damage and indicate installation problems. Address any leaks immediately to prevent further issues.
Conclusion
Installing a water heater thermostat can be straightforward. Following clear steps ensures safety. Always turn off power before starting. Use the right tools and materials. Double-check connections to avoid issues. Consult a professional if unsure. Proper installation improves efficiency and extends lifespan.
Regular maintenance keeps your water heater running smoothly. Remember, a well-installed thermostat saves energy. Enjoy warm showers without worry. Stay informed and confident in your DIY skills. Your home deserves the best care.