
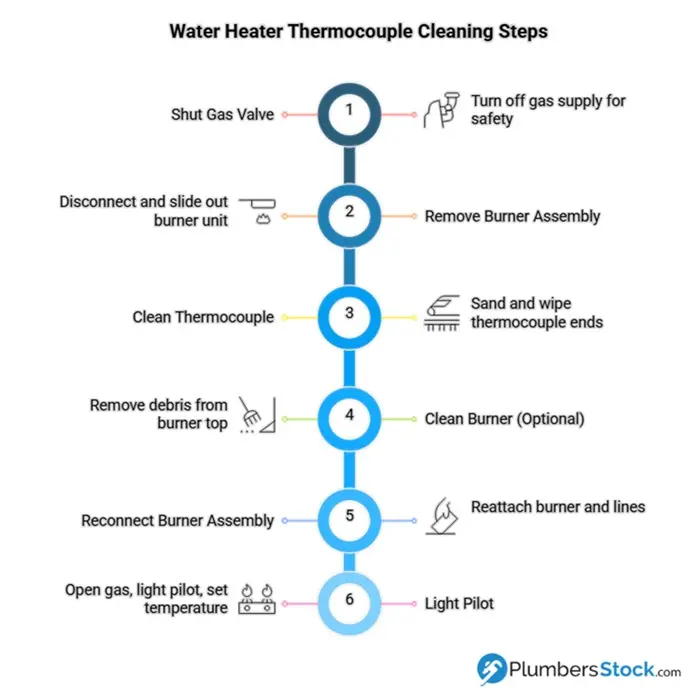
Is your water heater not lighting up like it used to? The problem might be a dirty thermocouple.
This small but vital part controls the flow of gas to your heater, and when it’s clogged with dirt or soot, your hot water supply can stop working. Don’t worry—you don’t need to call a costly technician right away. In this guide, you’ll learn exactly how to clean your thermocouple step-by-step.
By the end, you’ll have the confidence to fix the issue yourself, saving time and money while making sure your water heater runs smoothly again. Ready to get started? Let’s dive in.
Credit: www.plumbersstock.com
Page Contents
Tools Needed
Cleaning the thermocouple on a water heater requires a few simple tools. Having the right tools makes the job easier and safer. You do not need many items. Just gather these basic tools before starting.
Adjustable Wrench
An adjustable wrench helps to loosen and tighten the thermocouple nut. It fits different sizes of nuts and bolts. This tool prevents damage to the thermocouple or water heater parts.
Sandpaper Or Emery Cloth
Use fine-grit sandpaper or emery cloth to clean the thermocouple tip. It removes dirt, soot, and corrosion. This helps the thermocouple work properly and keeps the flame steady.
Soft Cloth
A soft cloth wipes off dust and debris from the thermocouple. It also cleans the surrounding area gently. This keeps the workspace tidy and safe.
Flashlight
A flashlight brightens the area around the water heater’s burner. It helps you see the thermocouple clearly. Good lighting ensures careful cleaning without missing spots.
Safety Precautions
Cleaning the thermocouple on a water heater needs care and attention. Safety precautions keep you safe and protect your home. Before starting, understand the risks and prepare properly. Follow these safety steps to avoid accidents or damage.
Turn Off The Gas Supply
Always switch off the gas supply before cleaning the thermocouple. This stops gas flow and lowers the risk of leaks or fire. Locate the gas valve and turn it to the off position.
Disconnect The Power
Unplug the water heater or switch off its circuit breaker. This prevents electric shocks or short circuits during cleaning. Check that the power is completely off before proceeding.
Work In A Well-ventilated Area
Open windows or doors to allow fresh air inside. Good ventilation helps disperse any gas fumes safely. Avoid working in tight, closed spaces to reduce inhaling harmful gases.
Use Proper Tools And Equipment
Use the right tools for cleaning to avoid damage. Wear gloves to protect your hands from dirt and sharp edges. Have a flashlight ready to see clearly inside tight spaces.
Check For Gas Leaks After Cleaning
After cleaning, check for gas leaks carefully. Use a gas leak detector or soapy water on connections. Look for bubbles that show leaks and fix them immediately.
Locate The Thermocouple
Locating the thermocouple on your water heater is the first step in cleaning it. The thermocouple is a small device that helps control the gas flow to the burner. Finding it can seem tricky, but it is usually in the same place on most water heaters.
Knowing where the thermocouple is saves time and helps you fix the heater faster. It also makes the cleaning process easier and safer. Follow these simple steps to locate it quickly.
Turn Off The Gas Supply
Before searching for the thermocouple, turn off the gas supply. This prevents accidents and keeps you safe. Find the gas valve near the heater and switch it off.
Remove The Access Panel
Most water heaters have a small metal panel at the bottom. Use a screwdriver to remove this panel. This opens the area where the burner and thermocouple are located.
Find The Burner Assembly
Look inside the open area for the burner assembly. It is a round or oval metal part with holes. The thermocouple is near the burner flame.
Spot The Thermocouple
The thermocouple looks like a thin copper tube. It is connected to the gas valve on one end. The other end sits near the burner flame to sense heat.
Check The Thermocouple Position
Make sure the thermocouple tip is right in the flame. This is important for it to work properly. If it is not in the flame, the heater may not light.
Credit: www.hopbroscervejaria.com.br
Turn Off The Water Heater
Turning off the water heater is the first and most important step before cleaning the thermocouple. This step ensures safety and prevents accidents. It stops the flow of gas or electricity, reducing risks of burns or shocks.
Taking time to switch off the water heater protects you and your home. It also helps avoid damage to the appliance during cleaning.
Locate The Power Source
Find the main power switch or circuit breaker for the water heater. For electric models, turn off the circuit breaker. For gas models, turn off the gas supply valve near the heater.
Confirm The Heater Is Off
Check that the water heater is no longer running. The pilot light should be off on gas models. For electric heaters, ensure no heat is produced or sounds heard.
Allow The Heater To Cool
Wait at least 30 minutes before touching any parts. The water and heater components remain hot for some time. Cooling prevents burns and makes cleaning safer.
Remove The Thermocouple
Removing the thermocouple is a key step in cleaning your water heater. This small part controls the gas flow to the pilot light. Dirt or damage can stop it from working well. Taking it out carefully helps you clean or replace it. Follow these steps for a safe removal.
Turn Off The Gas Supply
First, locate the gas valve and turn it off. This stops gas flow to the water heater. Safety is important. Wait a few minutes to let any gas clear out. Never skip this step.
Open the access panel of your water heater. The thermocouple is near the pilot light. It looks like a small metal rod with a wire. Knowing its place makes removal easier.
Disconnect The Thermocouple From The Gas Valve
Use an adjustable wrench to loosen the nut connecting the thermocouple. Turn it counterclockwise gently. Avoid forcing it to prevent damage. Keep the nut and wire safe for reassembly.
Remove The Thermocouple From The Pilot Assembly
Pull the thermocouple free from the pilot assembly. It may be held by a clip or bracket. Use care not to bend or break it. A smooth removal ensures it can be cleaned well.
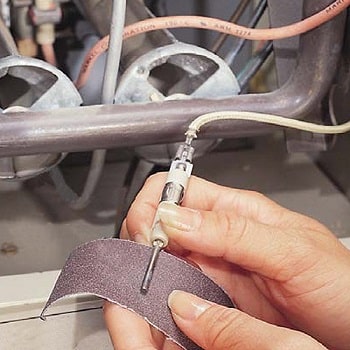
Clean The Thermocouple
Cleaning the thermocouple is a simple step to keep your water heater working well. Dirt and grime can block the sensor, causing the heater to stop working. Regular cleaning makes sure the thermocouple reads the temperature correctly. This helps your water heater stay safe and efficient.
Use Fine Sandpaper
Start by gently sanding the thermocouple tip with fine sandpaper. Use a light touch to remove any rust or dirt. Avoid using rough sandpaper that can scratch or damage the sensor. A smooth, clean surface helps the thermocouple detect heat better.
Wipe With A Cloth
After sanding, wipe the thermocouple with a soft cloth. This removes any leftover dust or particles. Use a dry cloth to avoid moisture that can cause corrosion. A clean sensor improves the water heater’s performance and safety.
Avoid Damaging The Sensor
Handle the thermocouple with care throughout cleaning. Do not bend or hit the sensor, as it is fragile. Avoid using harsh chemicals or sharp tools that can harm the surface. Protecting the thermocouple keeps your water heater working longer.
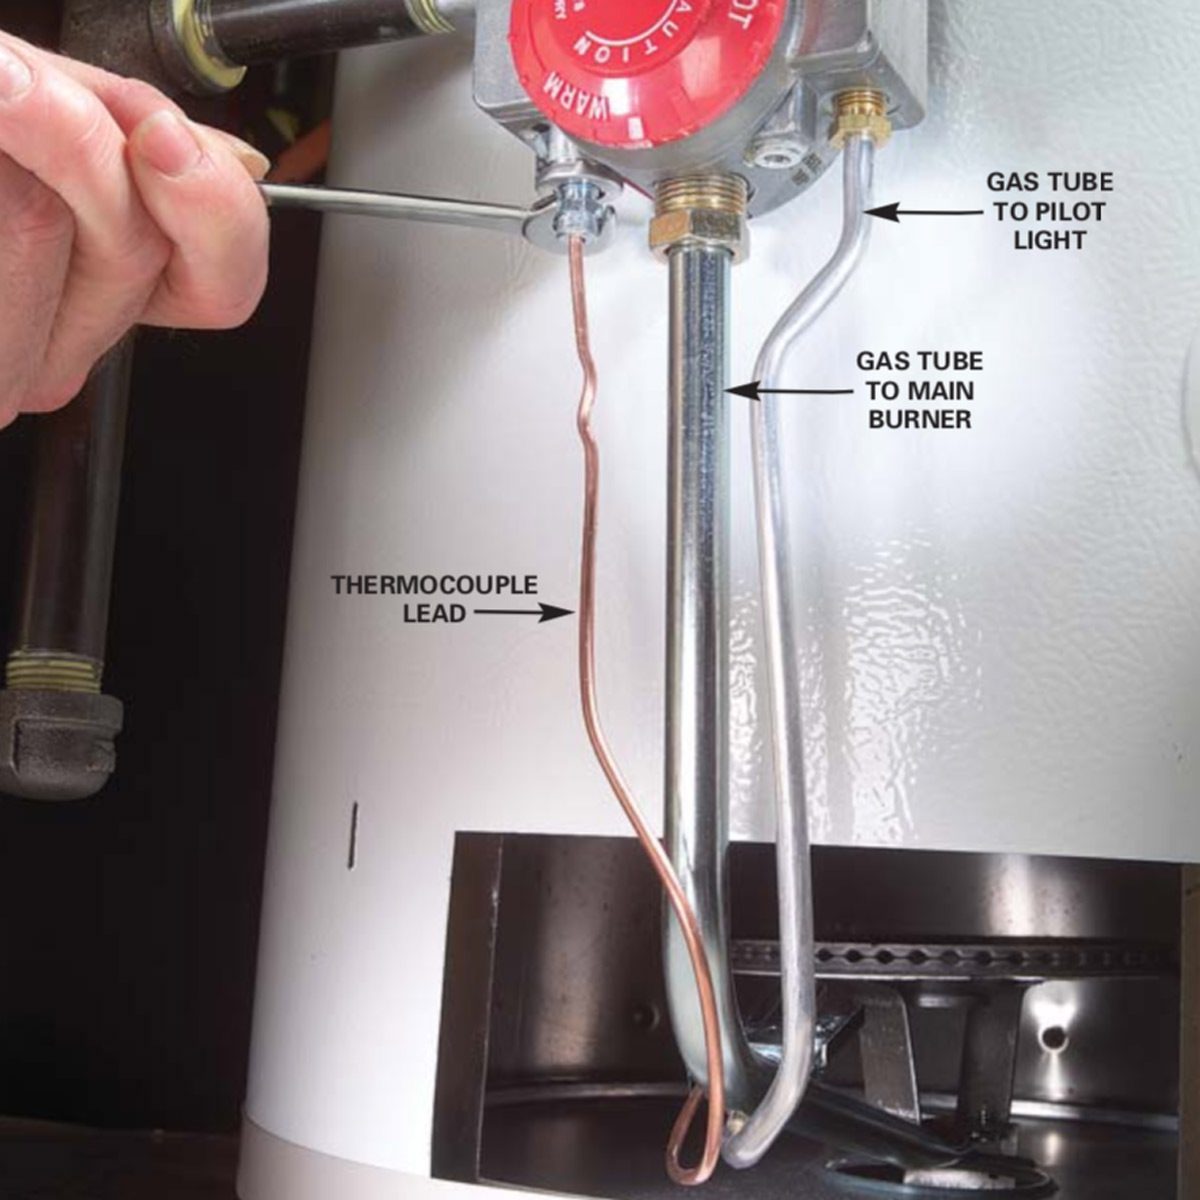
Reinstall The Thermocouple
Reinstalling the thermocouple is the last step after cleaning it. This step is important for your water heater to work safely and well. A properly installed thermocouple will help the pilot light stay lit. Follow these simple steps to put the thermocouple back in place correctly.
Position The Thermocouple Correctly
Place the cleaned thermocouple back near the pilot flame. The tip should be directly in the flame’s path. This helps the thermocouple sense the heat properly. Avoid letting it touch other parts inside the heater.
Secure The Thermocouple Nut
Thread the thermocouple’s nut onto the gas control valve. Turn it gently by hand at first. Use a wrench to tighten it just enough to hold firmly. Do not over-tighten or strip the threads.
Reconnect The Pilot Tube
Attach the pilot gas tube to the gas control valve. Ensure the connection is snug and tight. This allows gas to flow safely to the pilot light.
Test The Thermocouple Installation
Turn on the gas and light the pilot. Watch if the pilot stays lit steadily. If it does, the thermocouple is working well. If not, check the position and connections again.
Credit: www.familyhandyman.com
Test The Water Heater
Testing the water heater after cleaning the thermocouple is crucial. It confirms the device works safely and efficiently. This step helps detect any issues early. It ensures the cleaning process was successful. Follow these simple steps to test your water heater properly.
Turn On The Gas Supply
Start by turning the gas supply back on. Locate the gas valve near the water heater. Turn the valve to the “on” position slowly. You should hear a faint sound of gas flowing. Be cautious and avoid any sparks or flames nearby.
Light The Pilot
Next, light the pilot light following the manufacturer’s instructions. Usually, this involves pressing a button or using a lighter. Hold the button for about 30 seconds after ignition. This allows the thermocouple to heat up and stay on.
Observe The Flame
Check the pilot flame closely. It should be steady and blue, not yellow or flickering. A weak or irregular flame means the thermocouple may still be dirty or faulty. A strong flame indicates the thermocouple is working well.
Test The Main Burner
Turn the thermostat to a higher setting to activate the main burner. Wait for the burner to ignite. Listen for a steady, even flame sound. If it doesn’t ignite, the thermocouple might need further cleaning or replacement.
Monitor For Safety
Watch the water heater for a few minutes. Make sure the flame stays lit and does not go out. An unstable flame can cause gas leaks. If the flame goes out, turn off the gas immediately and check the thermocouple again.
When To Replace The Thermocouple
The thermocouple is a small but vital part of your water heater. It controls the gas flow to the pilot light. Over time, the thermocouple can wear out or stop working properly. Knowing when to replace it keeps your water heater safe and efficient. Watch for signs that the thermocouple needs changing.
Signs Of A Faulty Thermocouple
The pilot light will not stay lit. It may keep going out after lighting. This happens because the thermocouple fails to sense the flame. Another sign is no hot water. Your heater might shut off unexpectedly. Strange smells near the water heater can also point to a gas leak. These signs mean the thermocouple might be bad.
Testing The Thermocouple
Use a multimeter to check the thermocouple’s voltage. A good thermocouple should produce around 25 to 30 millivolts. Less than 25 millivolts means it may not work properly. Testing helps confirm if the thermocouple is the problem before replacing it.
Age And Wear
Thermocouples last between 3 and 5 years on average. Corrosion or damage can shorten their life. If your water heater is old, consider changing the thermocouple as part of regular maintenance. Old parts often fail without warning.
Frequently Asked Questions
How Do I Clean A Thermocouple On A Water Heater?
To clean a thermocouple, first turn off the gas supply. Remove the thermocouple and gently clean it with fine sandpaper or steel wool. Wipe off debris with a clean cloth. Reinstall and check for proper operation.
Why Is My Water Heater Thermocouple Dirty?
Thermocouples get dirty from soot, dust, and corrosion caused by incomplete combustion or poor ventilation. Dirt affects the sensor’s ability to detect the pilot flame, leading to heating issues.
How Often Should I Clean My Water Heater Thermocouple?
Cleaning your thermocouple once a year is ideal for maintenance. Regular cleaning ensures proper flame detection and efficient water heater performance. More frequent cleaning may be needed in dusty or smoky environments.
Can A Dirty Thermocouple Cause Water Heater Problems?
Yes, a dirty thermocouple can prevent the pilot light from staying lit. This causes the water heater to shut off frequently or fail to heat water properly.
Conclusion
Cleaning the thermocouple helps your water heater work better. It keeps the flame steady and saves energy. Regular cleaning stops the heater from shutting off unexpectedly. You only need a few tools and some time to do it. Stay safe by turning off the gas first.
A clean thermocouple means warm water when you need it. Small steps like this keep your home comfortable. Try it today and see the difference yourself. Simple care goes a long way.