
Are you wondering how to keep your home safe and efficient while installing a water heater roof vent? Getting this right is more important than you might think.
A properly installed roof vent not only protects your home from dangerous gases but also helps your water heater work better. You’ll discover easy-to-follow tips and expert advice that make the whole process simple and worry-free. Keep reading to learn how you can improve your home’s safety and comfort with the right water heater roof vent installation.
Choosing The Right Roof Vent
Choosing the right roof vent for your water heater is important for safety and efficiency. The vent helps remove gases produced during heating. Picking the correct vent prevents leaks and keeps your home safe. Several factors affect the choice of roof vent. These include vent type, materials, and size. Understanding these points helps you select the best option.
Types Of Roof Vents For Water Heaters
There are different types of roof vents for water heaters. The most common are metal pipe vents and plastic vents. Metal vents resist heat well and last longer. Plastic vents are lighter and easier to install. Some vents have caps to stop rain and debris. Choosing the right type depends on your water heater and roof design.
Material Considerations
Material quality affects vent durability and safety. Stainless steel is strong and resists rust. Galvanized steel is cheaper but can corrode over time. Plastic materials must be heat-resistant to avoid melting. Good material prevents leaks and vent damage. Match the vent material with your water heater’s exhaust type.
Sizing And Capacity
Size matters for proper venting. A vent too small blocks gas flow and causes buildup. A vent too large wastes energy and space. Check the water heater manual for vent size recommendations. The vent must handle the heater’s output volume. Proper size ensures safe and efficient operation.

Credit: www.youtube.com
Preparing For Installation
Preparing for water heater roof vent installation ensures a smooth process. Proper planning reduces mistakes and saves time. Each step matters to protect your home and system.
Assessing Roof Structure
Check the roof’s shape and material first. Know if the roof can hold extra weight. Look for weak spots or damage that need repair. Measure space for the vent to fit correctly. This step helps avoid leaks and structural problems later.
Gathering Necessary Tools And Materials
Collect all needed tools before starting. Typical tools include a drill, saw, measuring tape, and sealant. Get the right vent kit made for your water heater. Have safety gear like gloves and goggles ready. Being prepared speeds up the installation process.
Safety Precautions
Wear sturdy shoes and use a secure ladder. Work on dry days to avoid slipping. Turn off the water heater and power supply before work. Keep a fire extinguisher nearby for emergencies. Safety protects you and your home during the job.
Step-by-step Installation Process
Installing a water heater roof vent is key for proper ventilation. This guide breaks down the process into clear steps. Follow each carefully to ensure safety and efficiency.
Marking The Vent Location
Start by choosing the right spot on the roof. It should align with the water heater vent pipe inside. Use a pencil to mark the roof where the vent will go. Check for any obstacles like rafters or wires.
Cutting The Roof Opening
Use a saw to cut along the marked lines. Make the opening slightly bigger than the vent size. Wear safety gear to protect your hands and eyes. Remove any roofing materials carefully around the cut.
Sealing And Flashing Techniques
Apply roofing sealant around the opening edges. This prevents water leaks later on. Install flashing under the shingles around the vent base. Flashing guides water away from the vent. Ensure all gaps are sealed tightly.
Securing The Vent
Place the vent into the roof opening. Nail or screw it securely onto the roof deck. Check that the vent is straight and stable. Seal around the vent edges with roofing cement for extra protection.
Ensuring Proper Ventilation
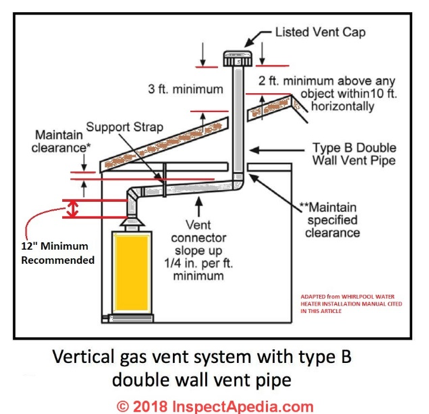
Proper ventilation is key for a water heater roof vent. It helps the heater work safely and efficiently. Good airflow stops dangerous gases from building up. It also reduces moisture that can cause damage. Making sure the vent is set up right protects your home and your family.
Positioning For Optimal Airflow
Place the vent where air can flow freely. Avoid spots blocked by trees or buildings. The vent should be high enough to let hot air rise out. Keep vents away from windows or vents for fresh air. This stops harmful gases from coming back inside.
Avoiding Common Venting Issues
Check the vent size matches the water heater’s needs. Too small or too large vents cause problems. Use the right materials to prevent leaks or rust. Secure all connections tightly to avoid gas leaks. Regular maintenance helps catch issues early.
Checking For Obstructions
Look for leaves, bird nests, or debris blocking the vent. Clear any blockages to keep air moving. Snow and ice can also block vents in winter. Inspect the vent often, especially after storms or heavy winds. Clear vents keep the system safe and running well.
Maintaining Roof Vents
Maintaining roof vents for your water heater is important for safety and efficiency. Proper care helps prevent leaks, blockages, and damage. Regular checks keep the vent working well and your home safe.
Regular Inspection Tips
Check roof vents at least twice a year. Look for cracks, rust, or loose parts. Watch for signs of water damage around the vent. Use binoculars if the roof is hard to reach. Early detection saves costly repairs.
Cleaning And Debris Removal
Remove leaves, dirt, and bird nests from vents. Clear vents allow gases to escape freely. Use a soft brush or blower for cleaning. Avoid harsh tools that can damage the vent. Clean vents improve air flow and prevent blockages.
Addressing Wear And Damage
Replace cracked or rusted vent covers immediately. Seal gaps with weatherproof caulk to stop leaks. Tighten loose screws or fasteners. Damaged vents can cause harmful fumes inside your home. Fix problems quickly to keep your water heater safe.

Credit: www.youtube.com
Compliance And Safety Codes
Installing a water heater roof vent requires strict attention to compliance and safety codes. These codes protect your home and family from hazards. Following them ensures proper venting and prevents dangerous gas buildup.
Meeting all regulations is necessary for legal and safe installation. Missing any code can cause fines or unsafe conditions. Understanding key safety and building rules helps avoid problems later.
Local Building Regulations
Every area has unique building rules for roof vent installation. These rules control vent size, placement, and materials. They also cover how vents connect to the water heater.
Checking local codes before starting work is crucial. Inspectors review installations to ensure they meet all standards. Non-compliance can lead to costly rework or removal.
Fire Safety Standards
Water heater vents must follow fire safety codes. These rules prevent vents from causing roof fires. Materials used should resist heat and sparks.
Proper clearance from flammable materials is required. Vent pipes must be sealed and insulated correctly. This reduces risk of fire and smoke damage.
Professional Installation Benefits
Experts know all safety and building codes. They install vents correctly the first time. This saves time and avoids code violations.
Professional installers use quality materials and follow best practices. They ensure vents work safely and efficiently. Hiring a pro gives peace of mind about your home’s safety.
Credit: cheltenhamnaacp.com
Conclusion
Proper water heater roof vent installation keeps your home safe and efficient. It helps remove harmful gases and prevents moisture buildup. Always follow local codes and use the right materials. Regular checks ensure the vent stays clear and works well.
A well-installed vent saves energy and extends your water heater’s life. Simple steps can protect your family and improve comfort. Take care with installation to avoid costly repairs later. A safe vent means peace of mind every day.